Getting started with IGEP MODULE
From IGEP - ISEE Wiki
Redirect to:
Contents
Introduction
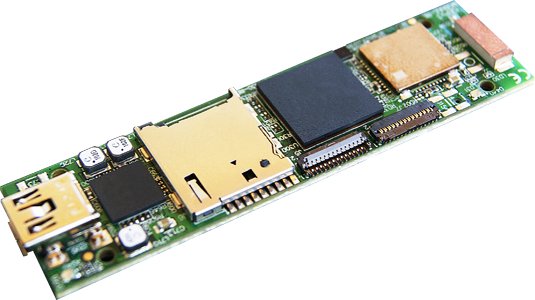
This page describes how to use the USB device port of the ISEE IGEP MODULE with OMAP3 processor to communicate with the USB port of your computer (or USB hub connected to your computer).

|
This article is out of date. The new article is Getting Started with IGEP0030 board |
|---|
You can power up the IGEP MODULE via the on-board USB OTG port, and we only need to use a USB cable (USB A type plug to mini B type plug).
The on-board HS USB OTG port is used as the default power input for IGEP MODULE standalone operating mode.
Once the board is powered up and running, we will get Ethernet connectivity over the same USB cable (USB Ethernet Gadget/RNDIS driver) or via wireless.
By default, the IGEP MODULE usb interface will have the IP address 192.168.7.2, and the wireless interface comes with WLAN_IGEP as ESSID and 192.168.6.1 as IP address.
Connect using USB Ethernet Gadget/RNDIS driver
Linux Host USB Network Configuration
You should have the usbnet module available for your Linux kernel. On most distributions, this is the case by default. If this is not the case for your distribution, you will need to enable USB networking support in the kernel. If you build your own kernel then you want 'CDC Ethernet support' in USB Network adaptors.
Ubuntu 10.04 LTS Lucid Lynx
In the file /etc/network/interfaces, you should add a section which looks like this:
auto usb0
iface usb0 inet static
address 192.168.7.1
network 192.168.7.0
netmask 255.255.255.0
broadcast 192.168.7.255
gateway 192.168.7.1
Connect to the board using ssh
ssh -l root 192.168.7.2

The authenticity of host '192.168.7.2 (192.168.7.2)' can't be established.
RSA key fingerprint is 9d:0e:ba:02:2a:76:e4:5f:d1:c1:9b:2d:85:6c:83:d4.
Are you sure you want to continue connecting (yes/no)? yes
Warning: Permanently added '192.168.7.2' (RSA) to the list of known hosts.
root@192.168.7.2's password: [enter] (no password)
root@igep0030:~#
Windows Host USB Network Configuration
Windows 7
Windows XP
1. During the first seconds the module is recognized as OMAP3430. Avoid the installation of this device and wait until RNDIS/Ethernet gadget is detected by the operating system.
2. The following driver INF file from the Gumstix Project works under Windows XP. http://www.davehylands.com/linux/gumstix/usbnet/linux.inf
3. In Control Panel/Network Connections and after driver installation set up the TCP/IP properties of the Local Network Connection (Linux USB Ethernet/RNDIS Gadget) as follow:
IP address 192.168.7.1

Netmask 255.255.255.0

Gateway 192.168.7.1
4. Use PuTTy to connect via SSH (192.168.7.2)
Thanks to Iñigo Lazkanotegi from Tecnalia (Donostia - San Sebastián) for this contribution.
Mac OS X Host USB Network Configuration
Please contribute ...
Connect using WLAN interface
Please contribute ...
Updating and flashing the firmware
Latest is: Poky 3.3.1-4 (timestamp version - 201011231641)
Updating the firmware is done using a SD card, first we will create a minimal SD card and copy latest firmware image into the SD card
mkdir workdir && cd workdir
wget http://downloads.igep.es/poky/green-3.3/v3.3.1-4/poky-media-create
wget http://downloads.igep.es/poky/green-3.3/v3.3.1-4/poky-media-minimal-igep0030-sdcard-3.3.1-4.tar.gz
chmod +x poky-media-create
Next, insert your SD card into the host machine and ensure you know the device node for your sd card reader. In the following example we assume /dev/mmcblk0. If you are unsure of the device node of your SD card, remove and reinsert the card and type dmesg on the command line. The last few lines should give you the device node of the card you just inserted.
./poky-media-create --mmc /dev/mmcblk0 --binary poky-media-minimal-igep0030-sdcard-3.3.1-4.tar.gz
Now it's time to download needed packages and copy into SD card
wget http://downloads.igep.es/poky/green-3.3/v3.3.1-4/poky-media-minimal-igep0030-flash-3.3.1-4.tar.gz
mkdir disk && sudo mount /dev/mmcblk0p2 disk
sudo tar xzf poky-media-minimal-igep0030-flash-3.3.1-4.tar.gz -C disk/home/root/
sudo umount disk && rmdir disk
Connect to device
ssh -l root 192.168.7.2
Next, enter into firmware directory
cd poky-media-minimal-igep0030-flash-3.3.1-4
By default the flash.sh script test fulls OneNAND, it takes a long time and it's not really necessary, we should speed up the flash process editing the flash.sh script and commenting next lines
# Test and mark OneNAND bad blocks
# for i in 0 1 2 3 4; do nandtest -m /dev/mtd${i}; done
Now you can run the flash script
./flash.sh
Troubleshooting
WARNING: REMOTE HOST IDENTIFICATION HAS CHANGED!
In the case of the SSH client in Linux, a changed host key results in the client refusing to connect and showing an remote host identification has changed error
@@@@@@@@@@@@@@@@@@@@@@@@@@@@@@@@@@@@@@@@@@@@@@@@@@@@@@@@@@@
@    WARNING: REMOTE HOST IDENTIFICATION HAS CHANGED!     @
@@@@@@@@@@@@@@@@@@@@@@@@@@@@@@@@@@@@@@@@@@@@@@@@@@@@@@@@@@@
IT IS POSSIBLE THAT SOMEONE IS DOING SOMETHING NASTY!
Someone could be eavesdropping on you right now (man-in-the-middle attack)!
It is also possible that the RSA host key has just been changed.
The fingerprint for the RSA key sent by the remote host is
8d:0b:29:f0:0a:a1:f5:56:0c:12:18:b0:26:02:6d:9d.
Please contact your system administrator.
Add correct host key in /home/eballetbo/.ssh/known_hosts to get rid of this message.
Offending key in /home/eballetbo/.ssh/known_hosts:57
RSA host key for 192.168.7.2 has changed and you have requested strict checking.
To fix the problem edit your ~/.ssh/known_hosts and remove the line corresponding to this host.


