Difference between revisions of "User:Pau pajuelo"
From IGEP - ISEE Wiki
(→Using Codeblocks) |
|||
| Line 81: | Line 81: | ||
*Gtk_example, Hello World in GTK. | *Gtk_example, Hello World in GTK. | ||
*C_example_without_autotools, custom Makefile “Hello World” program written in C. | *C_example_without_autotools, custom Makefile “Hello World” program written in C. | ||
| + | |||
| + | === Add Codeblocks examples to Workspace === | ||
| + | |||
| + | a | ||
=== Build programs === | === Build programs === | ||
| Line 107: | Line 111: | ||
Now use the followings steps to debug program:<br> | Now use the followings steps to debug program:<br> | ||
| − | {| | + | {| cellspacing="1" cellpadding="1" border="1" width="200" |
|- | |- | ||
| [[Image:Debugcodeblocks1.png|331px]] | | [[Image:Debugcodeblocks1.png|331px]] | ||
| Line 118: | Line 122: | ||
Image 1: set breakpoints in your source code | Image 1: set breakpoints in your source code | ||
| − | '''NOTE:''' You cant use igep-remote-x program with IGEP firmware (chapter 3.3 "Remote X")<br> | + | '''NOTE:''' You cant use igep-remote-x program with IGEP firmware (chapter 3.3 "Remote X")<br> |
= How to use SPI (prove with new firmware, under construction) = | = How to use SPI (prove with new firmware, under construction) = | ||
Revision as of 17:23, 6 August 2012
Contents
- 1 TODO: Update peripheral tutorials
- 2 Install and configure Codeblocks for IGEP devices
- 3 How to use SPI (prove with new firmware, under construction)
- 4 How to install Qt Creator (under construction)
- 5 How to install Eclipse (under construction)
TODO: Update peripheral tutorials
Install and configure Codeblocks for IGEP devices
Overview
Codeblocks is a free and open source, cross-platform IDE which supports multiple compilers including GCC and MSVC. It is developed in C++ using wxWidgets as the GUI toolkit. Using a plugin architecture, its capabilities and features are defined by the provided plugins. Currently, Codeblocks is oriented towards C and C++. It can also be used for creating ARM, AVR, D, DirectX, FLTK, Fortran, GLFW, GLUT, GTK+, Irrlicht, Lightfeather, MATLAB, OGRE, OpenGL, Qt, SDL, SFML, STL, SmartWin and wx programs and applications, although in some cases installing third-party SDKs or frameworks is necessary. More information here.
Codeblocks is not installed by default in IGEP SDK VM, because Eclipse IDE is full integrated with IGEP Firmware. If you don't like Eclipse IDE or you want to use Codeblocks anyway this How-to can be helpful to install, set up and use it.
Requirements
There are some requisites to follow this guide:
- IGEP SDK VM: follow the IGEP SDK SOFTWARE USER MANUAL (chapter 2.3 "Setting up and running the VM")
- IGEP Firmware: follow the IGEP SDK SOFTWARE USER MANUAL (chapter 6.1 "Create IGEP firmware bootable micro-sd card")
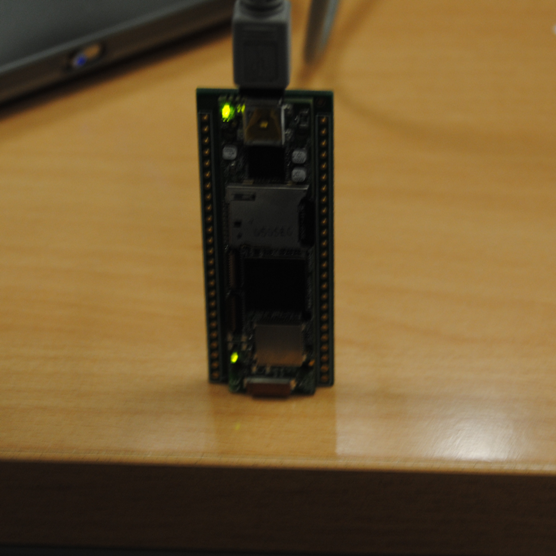
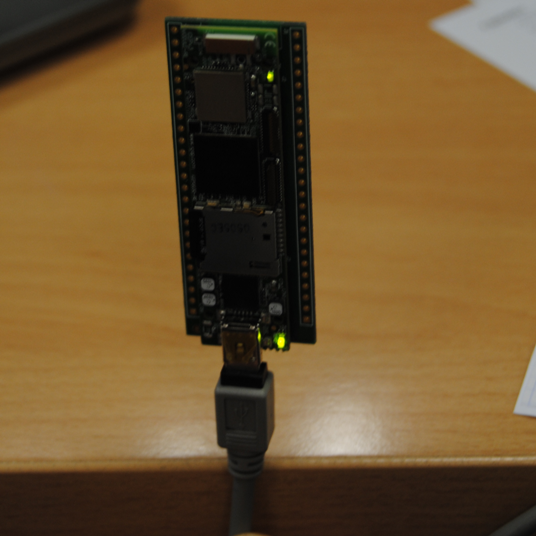
- IGEP Board
- Codeblocks examples
- MicroSD Card (optional)
Install Codeblocks in VM
sudo apt-get install codeblocks codeblocks-contrib
Configure Codeblocks
Startup script
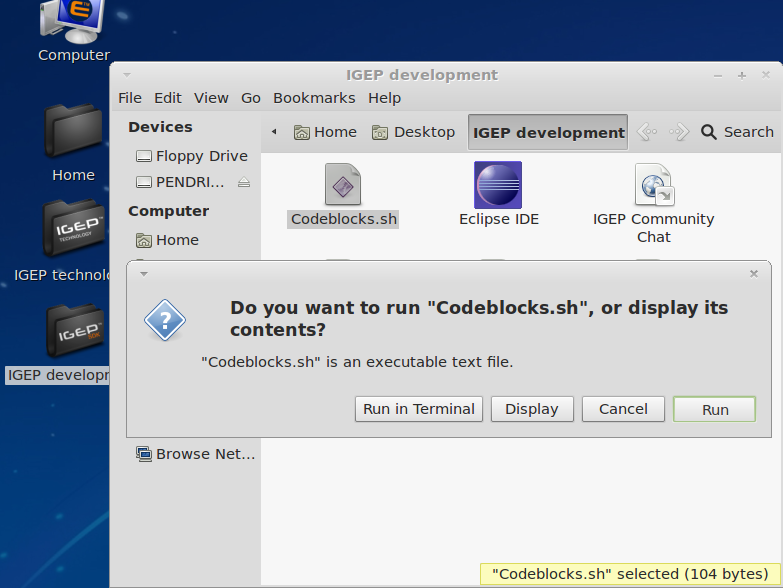
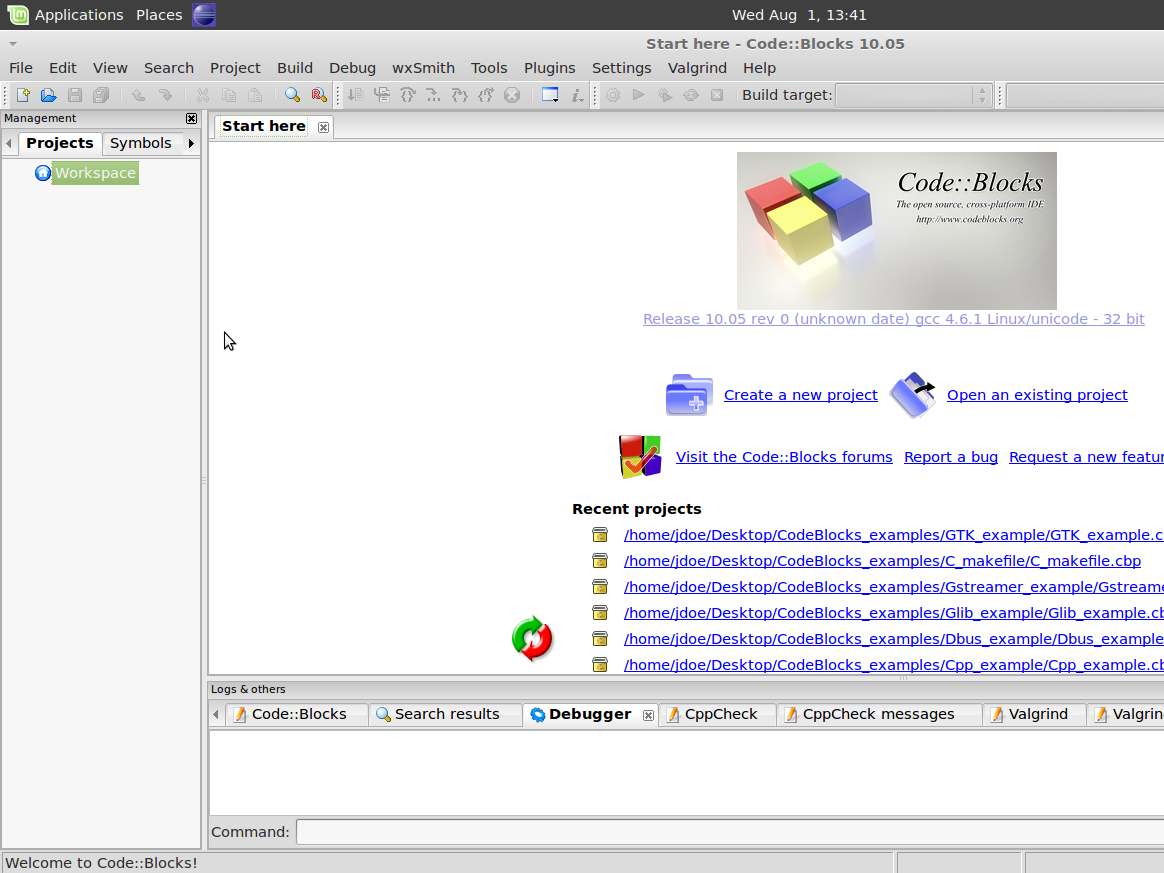
Codeblocks startup script (Codeblocks.sh) will let you to load IGEP SDK YOCTO environtment variables to IDE. Don't execute this script if you want to compile with other environtments like x86.
cd Desktop/IGEP\ development/
gedit Codeblocks.sh
Copy this code to Codeblocks.sh
#! /bin/bash
source /opt/poky/1.2/environment-setup-armv7a-vfp-neon-poky-linux-gnueabi
exec codeblocks
Give execute privileges to script:
chmod a+x ~/Desktop/IGEP\ development/Codeblocks.sh
 |
 |
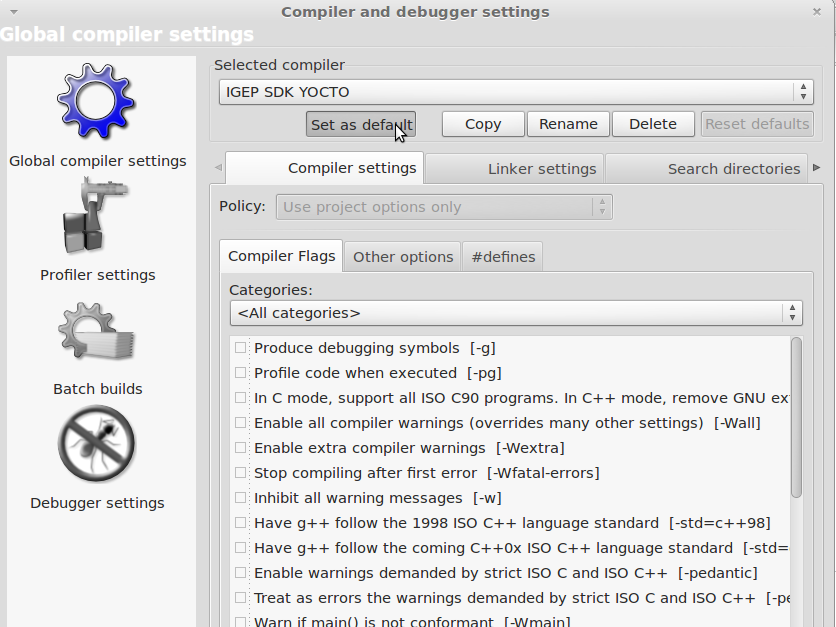
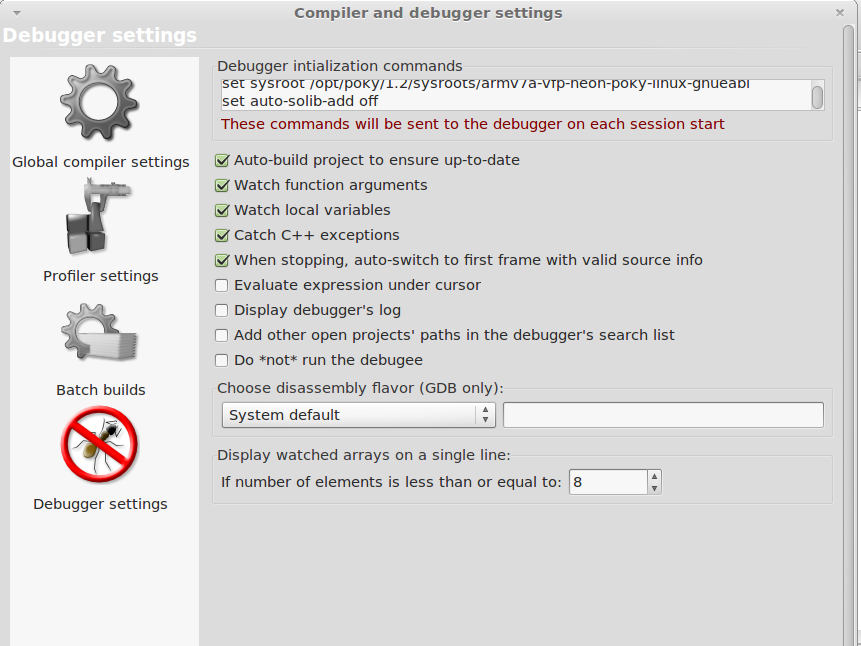
Add IGEP SDK Compiler and Debugger
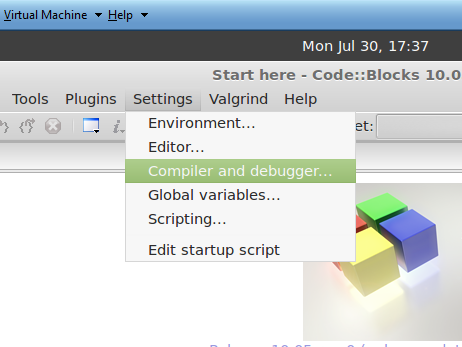
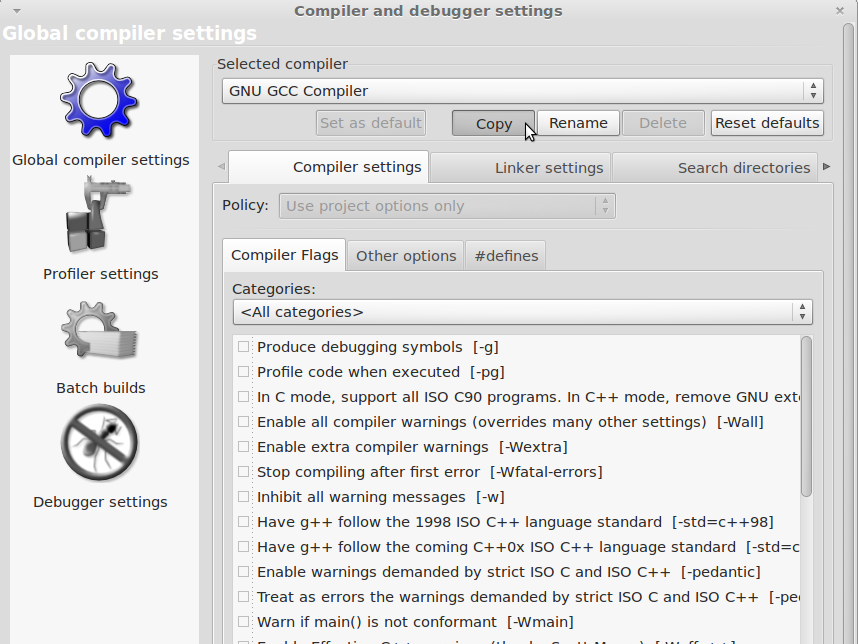
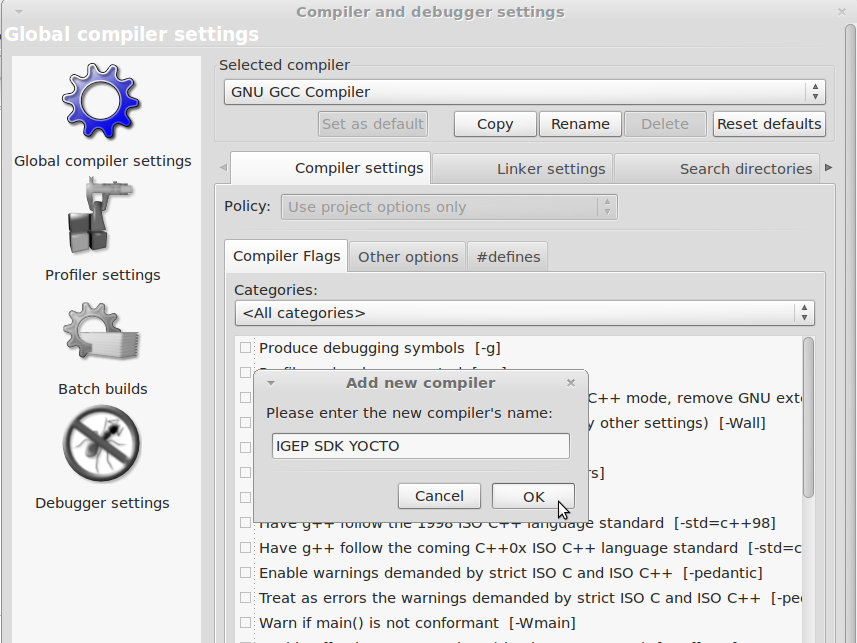
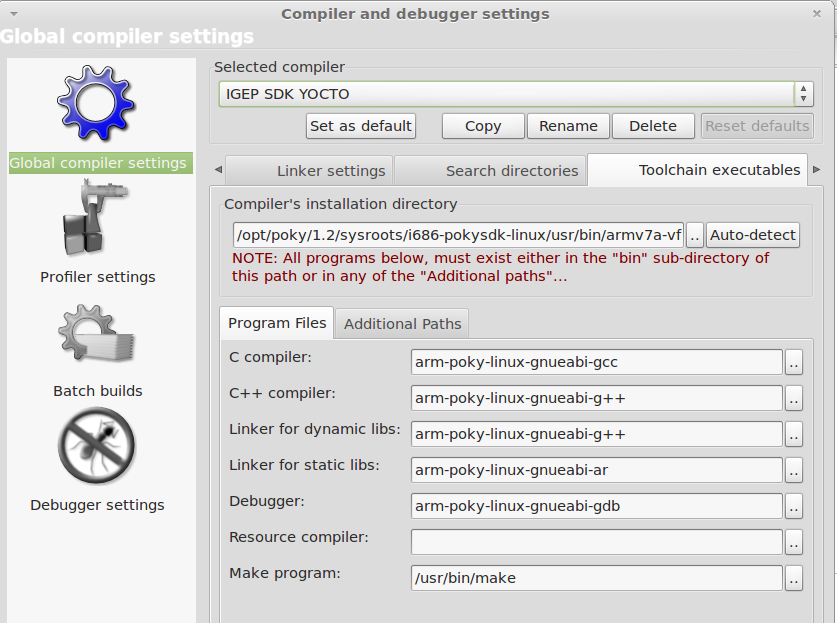
Follow the next instructions to add IGEP SDK Yocto support:
|
|
|
|
|
|
Click to enlarge image
Image 4: Compiler installation directory is: /opt/poky/1.2/sysroots/i686-pokysdk-linux/usr/bin/armv7a-vfp-neon-poky-linux-gnueabi
Image 6: Add to Debugger intialization commands:
- set sysroot /opt/poky/1.2/sysroots/armv7a-vfp-neon-poky-linux-gnueabi/
- set auto-solib-add off
Save all changes
Using Codeblocks
You can create two types of projects on Codeblocks: custom Makefile or managed by Codeblocks. These examples can be used as a template for your project. The examples are:
- C_example, Codeblocks-based “Hello World” program written in C.
- Cairo_example, generates a png file named hello.png.
- Cpp_example, Codeblocks-based “Hello World” program written in C++
- Dbus_example, sends "Hello Wolrd!" using D-Bus message system.
- Glib_example, simple “Hello World" written using Glib library.
- Gstreamer_example, ogg audio player using Gstreamer.
- Gtk_example, Hello World in GTK.
- C_example_without_autotools, custom Makefile “Hello World” program written in C.
Add Codeblocks examples to Workspace
a
Build programs
NOTE: Use Debug build if you want to debug later
Compile with: Build->Rebuild (Ctrl+F11).
Run programs
Once you compiled the program pass it from VM to IGEP via SSH, launch a terminal and type:
scp "pathtobinary" root@"IGEP IP for example: 192.168.5.1":/home/root
Get a remote shell prompt and run your program:
ssh root@"IGEP IP for example: 192.168.5.1"
./"binary"  "optional:arguments"
Debug programs
NOTE: When you debug programs using CodeBlocks "Step into" and "Step out" are not supported, because dinamic libraries symbols are not loaded by gdb.
Once you compiled the program pass it from VM to IGEP via SSH, launch a terminal and type:
scp "pathtobinary" root@"IGEP IP for example: 192.168.5.1":/home/root
Get a remote shell prompt and run gdbserver:
ssh root@"IGEP IP for example: 192.168.5.1"
gdbserver "VM IP for example: 192.168.5.10":1000 "pathtobinary" "optional:armguments"
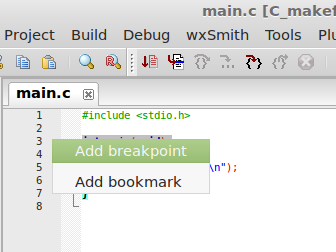
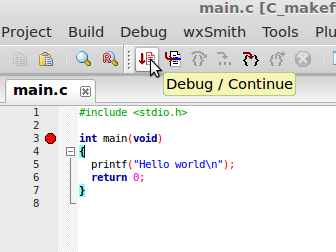
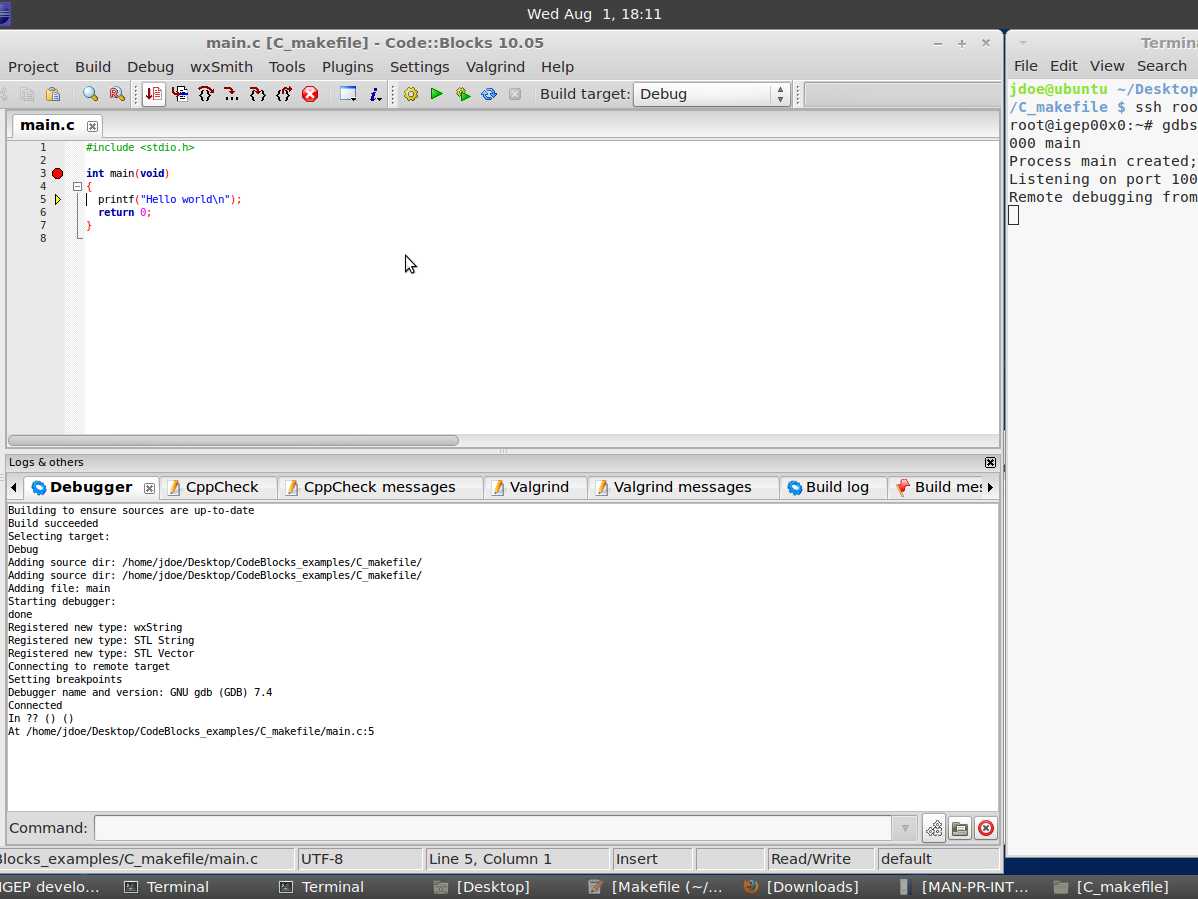
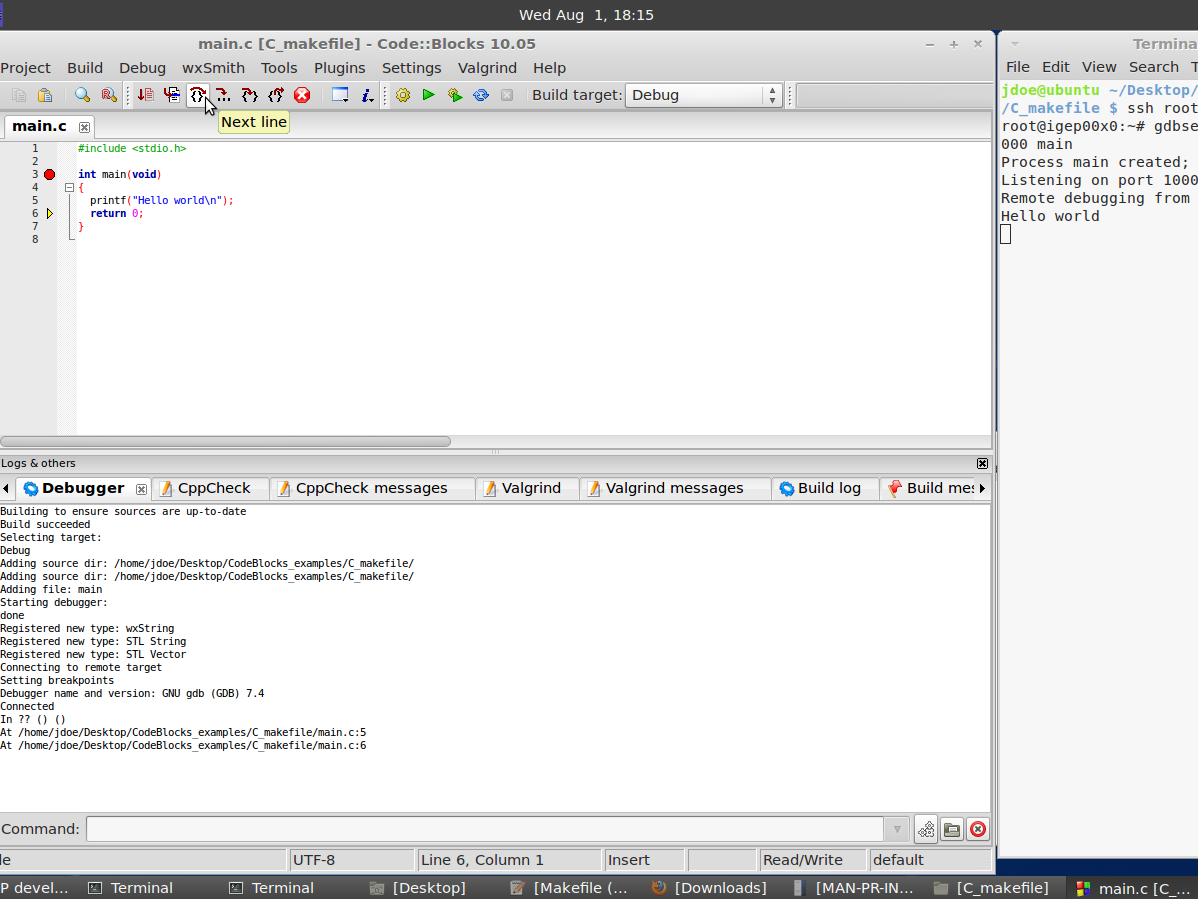
Now use the followings steps to debug program:
|
|
|
|
Image 1: set breakpoints in your source code
NOTE: You cant use igep-remote-x program with IGEP firmware (chapter 3.3 "Remote X")
How to use SPI (prove with new firmware, under construction)
Overview
This How-To is meant to be a starting point for people to learn use SPI for IGEP devices as quickly and easily as possible. In this how-to, we run an example program that reads and writes registers from 3-axis accelerometer (LIS3DH) included on the board IGEP New York. This program was tested in Poky firmware with Kernel 2.6.37.y.
Feedback and Contributing
At any point, if you see a mistake you can contribute to this How-To.
Requirements
There are a few requisites to follow this tutorial:
- IGEP YOCTO 1.2 Toolchain SDK
- IGEP Firmware yocto 1.2
- IGEP MODULE with IGEP New York
- SPI example Program (link program)
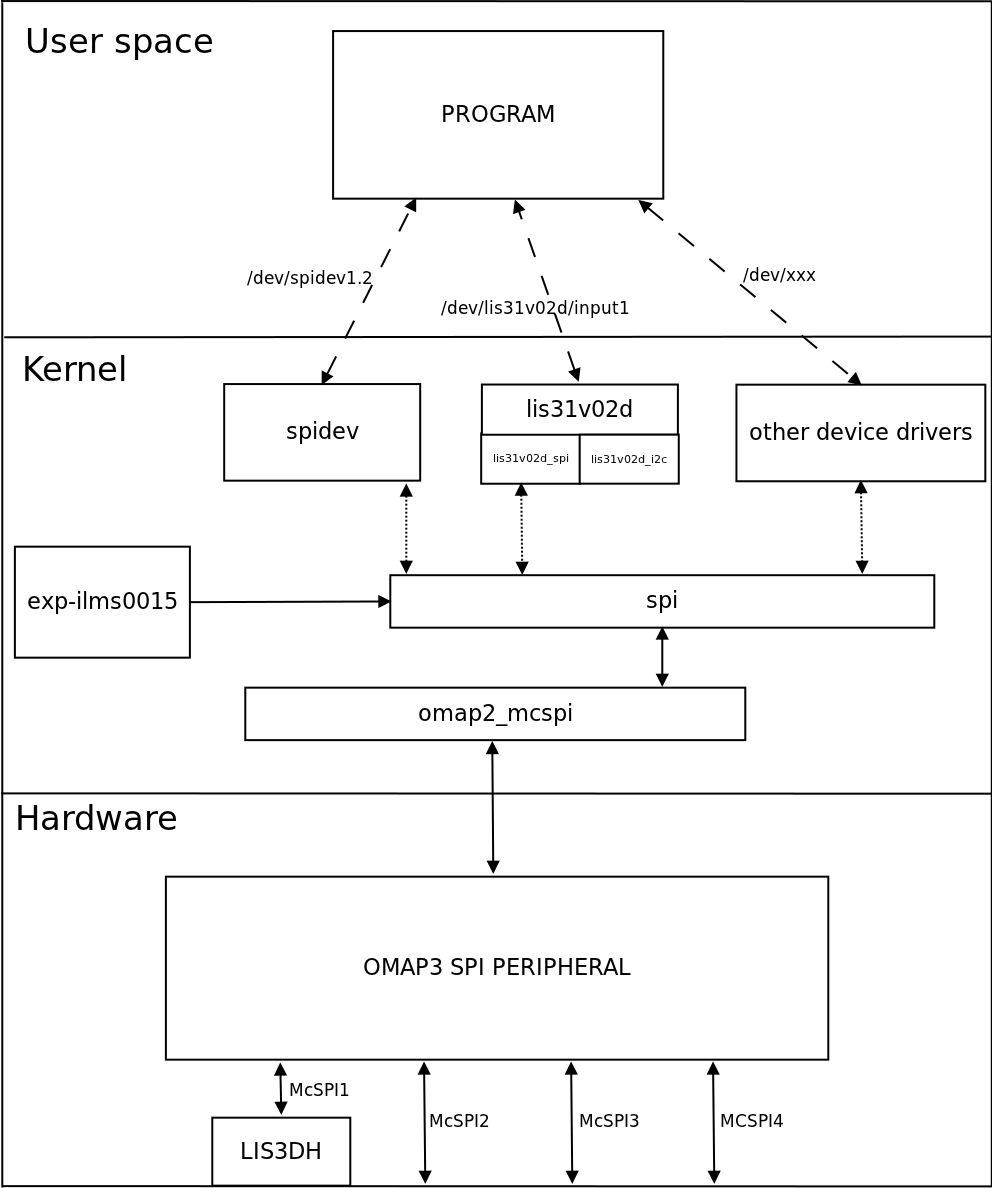
How Works
LIS3DH accelerometer: It is the accelerometer mounted in IGEP New York.
Omap3 SPI Peripheral: It is the hardware used to communicated with accelerometer and other SPI devices.
Omap2_mcspi: It is a bus driver than controls Omap3 SPI Peripheral.
Spi: It is a protocol driver that defines functions and strucs used in SPI bus.
Spidev: It is a device driver that export spi driver functionalities to userspace.
Lis3lv02d_spi: SPI glue layer for lis3lv02d
Lis31v02d: Device driver for LIS3DH accelerometer.
Exp_ilms0015: It is a startup program for IGEP New York. It attach lis31v02d with Spi driver.
|
More information about Linux Kernel SPI at:
Attach Spidev to SPI driver
Modify Linux Kernel Sources
To read accelerometer registers from spidev, we need to attach spidev driver to spi driver at start up. So it is necessary to modify spi_board.
Go to $(Kernel path)/arch/arm/mach-omap2/exp-ilms0015.c and edit the next fields in bold words.
|
static struct spi_board_info lis3lv02d_spi_board_info __initdata = { .modalias = "spidev", //.modalias = "lis3lv02d_spi", .bus_num = -EINVAL, .chip_select = -EINVAL, .max_speed_hz = 1*1000*1000, .irq = -EINVAL, .mode = SPI_MODE_0, //.platform_data = &lis3lv02d_pdata, }; inline void __init ilms0015_lis3lv02d_init(int bus_num, int cs, int irq) { struct spi_board_info *spi = &lis3lv02d_spi_board_info; if ((gpio_request(irq, "LIS3LV02D IRQ") == 0) && (gpio_direction_input(irq) == 0)) gpio_export(irq, 0); else { pr_err("IGEP: Could not obtain gpio LIS3LV02D IRQ\n"); return; } spi->bus_num = bus_num; spi->chip_select = cs; spi->irq = OMAP_GPIO_IRQ(irq), spi_register_board_info(&lis3lv02d_spi_board_info, 1); } ... void __init ilms0015_init(void) { mux_partition = omap_mux_get("core"); /* Mux initialitzation for ilms0015 */ omap_mux_write_array(mux_partition, ilms0015_mux); /* 3-axis accelerometer */ ilms0015_lis3lv02d_init(1, 2, 174); /* Export some GPIO */ ilms0015_gpio_init(); } |
Now spi_register_board_info has all information necessary to attach spidev driver instead lis3lv02d_spi.
Once we edit code, compile your modified Kernel, you can follow this tutorial for this purpose.
Enable ilms0015 support
“ilms0015” is the technical name of IGEP New York.
By default, poky-media-create (See: Poky firmware with Kernel 2.6.37.y) configured as igep0030, gives support only for IGEP Expansions Paris and Berlin. We need to configure igep.ini and gives support to IGEP New York:
| ; Machine configuration
;buddy=base0010 buddy.revision=B buddy=ilms0015 |
Test changes
Once you copy your new Kernel binaries and edit igep.ini. Power up your board, log in and check your changes:
|
root@igep00x0:/dev# lsmod Module Size Used by rfcomm 48522 0 hidp 13311 0 l2cap 49001 4 rfcomm,hidp bluetooth 67643 3 rfcomm,hidp,l2cap libertas_sdio 13887 0 libertas 99318 1 libertas_sdio option 13044 0 usb_wwan 7196 1 option usbserial 23870 2 option,usb_wwan spidev 4898 0 root@igep00x0:/dev# ls /dev/spidev1.2 /dev/spidev1.2 |
“spidev1.2”: refers at McSPI1 bus 2. Now we can communicate to accelerometer using spi driver functions.
SPI Test program
Overview
This program is based in spidev_test and it was edited to run with LIS3DH accelerometer, program can be explained in four parts:
Connection properties: program lets change via parameters SPI configurations like: device, max speed, delay, bits per word, clock phase, clock polarity, etc. If you don't use any of this parameters program will use default options for LIS3DH communication.
Read mode: Reads a word from a register.
Write mode: Writes a word in a register.
Test mode: Reads X, Y and Z axes from accelerometer.
We recommend to read peripheral datasheet before use or modify program.
Compile program
The program source was compiled with Poky SDK but you can use other compilers like Linaro Toolchain:
arm-poky-linux-gnueabi-gcc spiexamplebeta2.c -o spiexampleb2
Copy your final binary to rootfs.
Test program
Read WHO_AM_I register(0Fh)
LIS3DH has this dummy register (See 8.6 chapter) as a device identification. Its value is 0x33:
root@igep00x0:~# ./spiexampleb2 -R 0F
spi mode: 0
bits per word: 8
max speed: 1000000 Hz (1000 KHz)
Value from 0F is: 33
root@igep00x0:~#
Read and Write CTRL_REG1 (20h)
This register is used to enable/disable: accelerometer and XYZ axes (See 8.8 chapter). The default value at startup is:
root@igep00x0:~# ./spiexampleb2 -R 20
spi mode: 0
bits per word: 8
max speed: 1000000 Hz (1000 KHz)
Value from 20 is: 07
root@igep00x0:~#
It means that accelerometer was disabled and X, Y and Z axes was enabled. For example we can disable X axe typing:
root@igep00x0:~# ./spiexampleb2 -W 20 -V 06
spi mode: 0
bits per word: 8
max speed: 1000000 Hz (1000 KHz)
Register to write 20 with value 06
root@igep00x0:~# ./spiexampleb2 -R 20
spi mode: 0
bits per word: 8
max speed: 1000000 Hz (1000 KHz)
Value from 20 is: 06
root@igep00x0:~#
Read accelerometer axes
root@igep00x0:~# ./spiexampleb2 -T
spi mode: 0
bits per word: 8
max speed: 1000000 Hz (1000 KHz)
Accelerometer TEST
Values from X -64, Values from Y -15872 and Values from Z -256
root@igep00x0:~#
The next table shows results at different positions:
| Position | ±2g scale | ±4g scale | ±8g scale | ±16g scale |
| X = 832
Y = 1024 Z = 15680 |
X = 256 Y = 128 Z = 7872 |
X = 128 Y = 128 Z = 4032 |
X = 64 Y = 128 Z = 1280 | |
|
X = 256 Y = 704 Z = -17216 |
X = 256 Y = 256 Z = -8320 |
X = 64 Y = 128 Z = -4096 |
X = 128 Y = 128 Z = -1344 | |
|
X = -15872 Y = 64 Z = -320 |
X = -7936 Y = 64 Z = -512 |
X = -3968 Y = 128 Z = -192 |
X = -1280 Y = 64 Z = -128 | |
|
X = 16448 Y = 640 Z = 640 |
X = 8128 Y = 192 Z = 384 |
X = 4032 Y = 64 Z = 64 |
X = 1344 Y = 64 Z = 192 | |
|
X = 896 Y = 16512 Z = -576 |
X = 320 Y = 8128 Z = -128 |
X = 192 Y = 4096 Z = -64 |
X = 128 Y = 1344 Z = -128 | |
|
X = -64 Y = -15872 Z = -256 |
X = -512 Y = -7808 Z = -384 |
X = -64 >Y = -3840 Z = -384 |
X = -128 Y = -1216 Z = -128 |


