Difference between revisions of "Using IGEP WLAN to communicate"
From IGEP - ISEE Wiki
m |
|||
| (7 intermediate revisions by 2 users not shown) | |||
| Line 1: | Line 1: | ||
| − | + | <section begin=exclude /> | |
| + | {{Message/Information Message|title=|message= In this guide is used [[ IGEP firmware Yocto ]]}} | ||
| + | <section end=exclude /> | ||
| + | === Overview === | ||
| − | You can open a SSH session in your computer and interact with your Board from your console. Here is how to. | + | If your IGEP Processor Board has '''WIFI interface''' you can connect to it without any cable. You can open a SSH session in your computer and interact with your Board from your console. Here is how to. |
| − | + | === Requirements === | |
| − | + | There are some requisites to follow this guide: | |
| − | < | + | *IGEP Processor Board with WIFI |
| + | *Host computer with WIFI | ||
| + | *[http://www.chiark.greenend.org.uk/~sgtatham/putty/download.html PuTTy program] | ||
| + | <section begin=wifi_connect /> | ||
| + | === Connect to IGEP network === | ||
| − | {| | + | Follow these steps to connect to your IGEP device: |
| + | |||
| + | *Click on the Network Manager Tray icon. | ||
| + | *Select IGEP_<xx> network, where <xx> is different for every IGEP device, to connect. | ||
| + | |||
| + | {| cellspacing="1" cellpadding="1" border="1" width="200" | ||
|- | |- | ||
| − | + | | [[Image:Igep wificon1.png|331px]] | |
| − | | | + | | [[Image:Igep wificon2.png|331px]] |
|} | |} | ||
| − | < | + | '''<sup>Click to enlarge image</sup>''' |
| − | |||
| − | === | + | === Connect to IGEP === |
| − | + | Follow these steps to get a remote shell prompt: | |
| − | * | + | *Open PuTTy program |
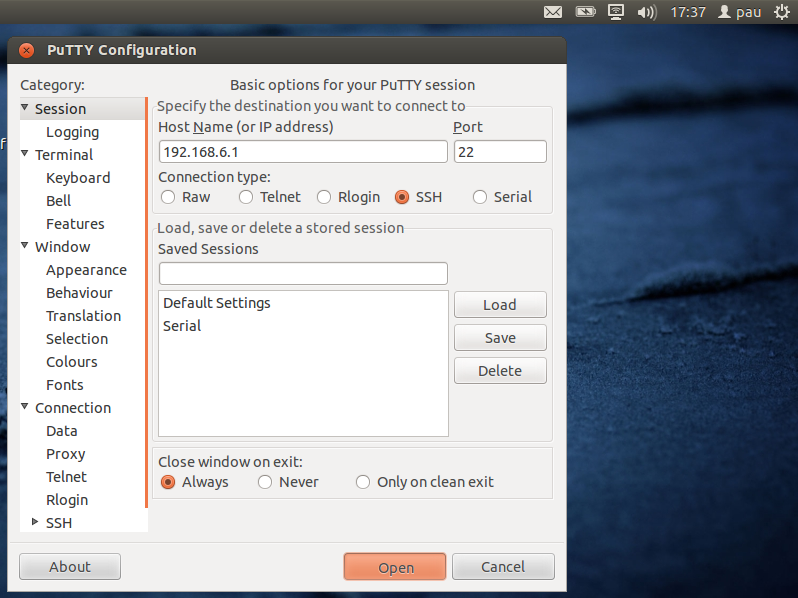
| − | * | + | *Host Name:192.168.6.1 |
| + | *Port: 22 | ||
| + | *Connection type: SSH | ||
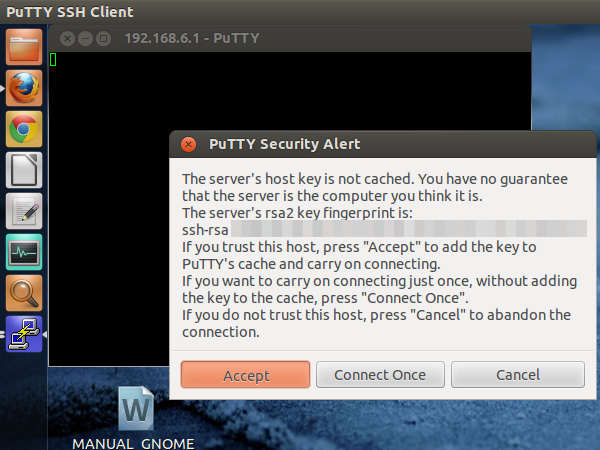
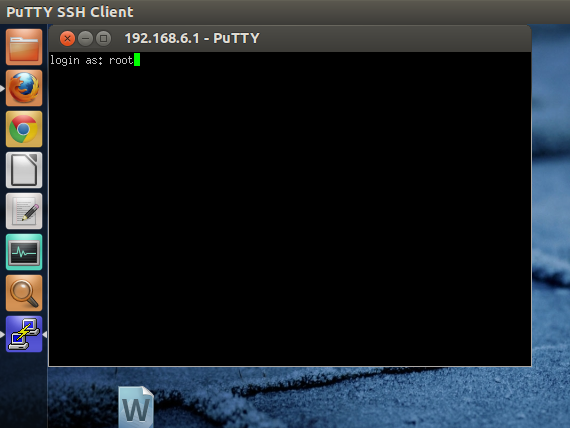
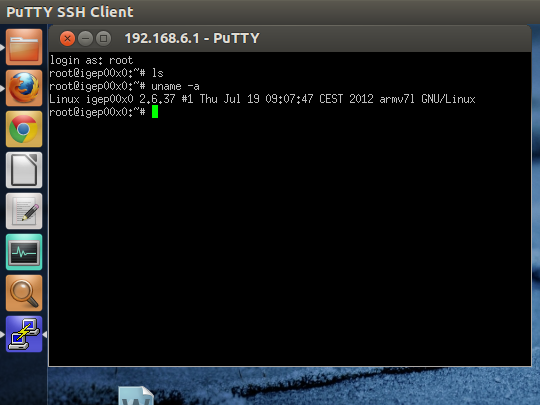
| + | *Click Open, accept Security Alert and login as root user | ||
| − | + | {| cellspacing="1" cellpadding="1" border="1" width="200" | |
| − | + | |- | |
| − | === | + | | [[Image:Igep wifiputty1.png|331px]] |
| − | + | | [[Image:Igep wifiputty2.png|331px]] | |
| − | + | |- | |
| − | + | | [[Image:Igep wifiputty3.png|331px]] | |
| − | + | | [[Image:Igep wifiputty4.png|331px]] | |
| − | + | |} | |
| − | |||
| − | |||
| − | |||
| − | |||
| − | |||
| − | |||
| − | |||
| − | |||
| − | |||
| − | |||
| − | |||
| − | |||
| − | |||
| − | |||
| − | |||
| − | |||
| − | |||
| − | |||
| − | |||
| − | |||
| − | |||
| − | |||
| − | |||
| − | |||
| − | |||
| − | |||
| − | |||
| − | |||
| − | |||
| − | |||
| − | |||
| − | |||
| − | |||
| − | |||
| − | |||
| − | |||
| − | |||
| − | |||
| − | |||
| − | |||
| − | |||
| − | |||
| − | |||
| − | |||
| − | |||
| − | |||
| − | |||
| − | |||
| − | |||
| − | |||
| − | |||
| − | |||
| − | |||
| − | |||
| − | |||
| − | |||
| − | |||
| − | |||
| − | |||
| − | |||
| − | |||
| − | |||
| − | |||
| − | |||
| − | |||
| − | |||
| − | |||
| − | |||
| − | |||
| − | |||
| − | |||
| − | |||
| − | |||
| − | |||
| − | |||
| − | |||
| − | |||
| − | |||
| − | |||
| − | |||
| − | |||
| − | |||
| − | |||
| − | |||
| − | |||
| − | + | '''<sup>Click to enlarge image</sup>''' | |
| − | </ | + | Note that a DHCP IP address in range 192.168.6.10-192.168.6.254 should be given to your host PC. The IGEP device should have IP address 192.168.6.1. |
| − | + | <section end=wifi_connect /> | |
| + | === Troubleshooting === | ||
| − | + | ==== NFS in root filesystem ==== | |
| − | + | Don't use NFS in root filesystem combined with WIFI | |
| − | |||
| − | |||
| − | |||
| − | == See also == | + | === See also === |
*[[How to setup Marvell 88w8686 SDIO wifi]] | *[[How to setup Marvell 88w8686 SDIO wifi]] | ||
| Line 139: | Line 66: | ||
*[[Using SSH to communicate]] | *[[Using SSH to communicate]] | ||
| − | [[Category: | + | [[Category:Wifi]] |
Latest revision as of 16:26, 27 August 2012

|
In this guide is used IGEP firmware Yocto |
Contents
Overview
If your IGEP Processor Board has WIFI interface you can connect to it without any cable. You can open a SSH session in your computer and interact with your Board from your console. Here is how to.
Requirements
There are some requisites to follow this guide:
- IGEP Processor Board with WIFI
- Host computer with WIFI
- PuTTy program
Connect to IGEP network
Follow these steps to connect to your IGEP device:
- Click on the Network Manager Tray icon.
- Select IGEP_<xx> network, where <xx> is different for every IGEP device, to connect.
| |
|
Click to enlarge image
Connect to IGEP
Follow these steps to get a remote shell prompt:
- Open PuTTy program
- Host Name:192.168.6.1
- Port: 22
- Connection type: SSH
- Click Open, accept Security Alert and login as root user

|

|

|

|
Click to enlarge image
Note that a DHCP IP address in range 192.168.6.10-192.168.6.254 should be given to your host PC. The IGEP device should have IP address 192.168.6.1.
Troubleshooting
NFS in root filesystem
Don't use NFS in root filesystem combined with WIFI


