


Difference between revisions of "Getting started with IGEPv2"
From IGEP - ISEE Wiki
m (→Log into IGEPv2 via Ethernet interface) |
m (→Log into IGEPv2 via Ethernet interface) |
||
| Line 125: | Line 125: | ||
== Log into IGEPv2 via Ethernet interface == | == Log into IGEPv2 via Ethernet interface == | ||
| + | {{Message/Information Message|title=|message=In non-Linux operating system, use [http://labs.isee.biz/index.php/IGEP_SDK_Virtual_Machine IGEP SDK Virtual Machine] to connect to IGEP COM MODULE via USB or read article [http://labs.isee.biz/index.php/Using_USB_ethernet_gadget_to_communicate "Using USB ethernet gadget to communicate"]}} | ||
| − | + | Open a Terminal session and set the IP of the Ethernet interface in which IGEP is connected (for example eth0): | |
| − | + | *In the file /etc/network/interfaces, you should add: | |
| + | <pre>iface eth0 inet dhcp | ||
| + | iface eth0:0 inet static | ||
| + | address 192.168.5.10 | ||
| + | netmask 255.255.255.0</pre> | ||
| + | *Type in a terminal: | ||
| + | <pre>sudo ifup eth0:0</pre> | ||
| + | *Revise that: | ||
| + | <pre>jdoe@ubuntu ~ $ ifconfig | ||
| + | ... | ||
| + | eth0:0 Link encap:Ethernet HWaddr 08:00:27:ad:0c:ad | ||
| + | inet addr:192.168.5.10 Bcast:0.0.0.0 Mask:255.255.255.0 | ||
| + | UP BROADCAST RUNNING MULTICAST MTU:1500 Metric:1 | ||
| + | ...</pre> | ||
| + | *Connect to IGEP device | ||
| − | + | jdoe@ubuntu ~ $ ssh root@192.168.5.1 | |
| − | |||
| − | |||
| − | |||
| − | |||
| − | |||
| − | |||
| − | |||
| − | |||
| − | |||
| − | |||
| − | |||
| − | |||
| − | |||
| − | |||
| − | |||
| − | |||
| − | |||
| − | |||
| − | |||
| − | |||
| − | |||
| − | |||
| − | |||
| − | |||
| − | |||
| − | |||
| − | |||
| − | |||
| − | |||
| − | |||
| − | |||
| − | |||
| − | |||
| − | |||
| − | |||
| − | |||
| − | |||
| − | |||
| − | |||
| − | |||
| − | |||
| − | |||
| − | |||
| − | |||
| − | |||
| − | |||
| − | |||
| − | |||
| − | |||
| − | |||
| − | |||
| − | |||
| − | |||
| − | |||
| − | |||
| − | |||
| − | |||
| − | |||
| − | |||
| − | |||
| − | |||
| − | |||
| − | |||
| − | |||
| − | |||
| − | |||
| − | |||
| − | |||
| − | |||
| − | |||
| − | |||
| − | |||
| − | |||
| − | |||
| − | |||
| − | |||
| − | |||
| − | |||
| − | |||
| − | |||
| − | |||
{{Navigation/IGEP Technology Guides/Getting Started/Ending | {{Navigation/IGEP Technology Guides/Getting Started/Ending | ||
|Next_Step={{#lst:Template:Links|IGEPv2_Community_Guides_2}} | |Next_Step={{#lst:Template:Links|IGEPv2_Community_Guides_2}} | ||
Revision as of 13:34, 29 August 2012
|
|
Contents
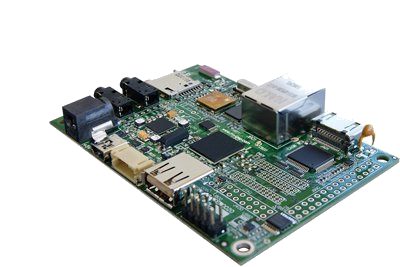
Overview
This is the 1/3 chapter of IGEPv2 Tutorial Guide.
In this first chapter, we will learn how to connect some peripherals, how to boot IGEPv2 and how to log into IGEPv2 via Ethernet.
Requirements
In this tutorial we are going to use the following peripherals:
- IGEPv2 with its power supply
- A monitor compatible with DVI-D
- A network cable.
- An USB keyboard and a mouse
- A PC
Getting started
Connect a DVI monitor
Basic
IGEPv2 has a HDMI connector with a DVI-D interface
Connect IGEPv2 to a DVI-D compatible monitor.
Know more
The Digital Visual Interface (DVI) is a video standard interface designed to provide very high visual quality on digital display devices such as flat panel LCD computer displays and digital projectors. It is partially compatible with the High-Definition Multimedia Interface (HDMI) standard in digital mode (DVI-D), and VGA in analog mode (DVI-A).
Note that your monitor should be able to support 1024 x 768 @ 60 Hz, which is the default resolution in the preinstalled software.
Connect an Ethernet Network cable
Basic
Plug an Ethernet cable between IGEPv2 and your client machine (or any other network device with ethernet connectivity).
Know more
IGEPv2 comes with one 10/100BASE-TX Ethernet ports.
In the following chapters we will use ethernet to access IGEPv2 with IP configuration, send files, etc.
Connect USB devices (keyboard and mouse)
Basic
Connect a USB hub to the USB type-A connector (USB Host) in IGEPv2.
Then plug a USB keyboard and USB mouse to the USB hub.
Know more
Only USB 2.0 devices will work in IGEPv2, so if you connect any USB mouse 1.0 into the USB host connector without using a USB hub 2.0, it will not work.
Power up IGEPv2 (5V DC)
Basic
Once you have connected the peripherals you can apply power to your IGEPv2 (5V DCC).
Know more
Led's sequence:
When you power up your board, you will also see how two red LED's light up while the system boots (the sequence will be different based on software version). After a few seconds, there is a fixed green led on.
Boot priority:
IGEPv2 can boot from many other devices (listed by priority):
- from USB
- from UART3
- from a MMC/MicroSD card
- from OneNAND memory
As we haven't set any other boot device rather than the oneNAND (the IGEPv2 flash memory) the system boots from it.
But, for example, if as the MicroSD card has an upper priority than the flash, if you plug a MicroSD card into IGEPv2 (with the right configuration on it), it will boot from the MicroSD card.
Test the Demo software distribution
Basic
When IGEPv2 powers up, the desktop of the preinstalled software will appear on the screen.
You can use the mouse and the keyboard to test the demo applications.

Know more
All IGEP Processor Boards, including IGEPv2, have a pre-installed software in its flash memory which consists of a minimal Linux-based distribution with a lite X Window System and GNOME Mobile based applications created with Poky Platform Builder.
In the next chapter of this tutorial guide, we will learn how to update the pre-installed software of your board.
Log into IGEPv2 via Ethernet interface

|
In non-Linux operating system, use IGEP SDK Virtual Machine to connect to IGEP COM MODULE via USB or read article "Using USB ethernet gadget to communicate" |
Open a Terminal session and set the IP of the Ethernet interface in which IGEP is connected (for example eth0):
- In the file /etc/network/interfaces, you should add:
iface eth0 inet dhcp
iface eth0:0 inet static
address 192.168.5.10
netmask 255.255.255.0
- Type in a terminal:
sudo ifup eth0:0
- Revise that:
jdoe@ubuntu ~ $ ifconfig
...
eth0:0    Link encap:Ethernet  HWaddr 08:00:27:ad:0c:ad
          inet addr:192.168.5.10  Bcast:0.0.0.0  Mask:255.255.255.0
          UP BROADCAST RUNNING MULTICAST  MTU:1500  Metric:1
...
- Connect to IGEP device
jdoe@ubuntu ~ $ ssh root@192.168.5.1
You have successfully completed this chapter of the guide.
|

|
If you have any question, don't ask to ask at the IGEP Community Forum or the IGEP Community Chat | 
|
|
|