


Difference between revisions of "Getting started with IGEP COM PROTON"
From IGEP - ISEE Wiki
m |
|||
| Line 1: | Line 1: | ||
| − | |||
| − | |||
{{Table/IGEP Technology Devices | {{Table/IGEP Technology Devices | ||
|Tech_Family={{#lst:Template:Links|IGEP_COM_PROTON_Tech_Family}} | |Tech_Family={{#lst:Template:Links|IGEP_COM_PROTON_Tech_Family}} | ||
| Line 11: | Line 9: | ||
| − | + | __TOC__ | |
| − | |||
| − | |||
| − | |||
| − | |||
| − | |||
| − | |||
| − | |||
| + | = Overview = | ||
| − | This | + | This is the 1/3 chapter of IGEP COM PROTON Tutorial Guide. |
| + | In this first chapter, we will learn '''how to connect IGEP COM PROTON''' and '''how to log into IGEP COM PROTON via USB'''. | ||
| − | == | + | = Requirements = |
| − | |||
| − | In | + | In this tutorial we are going to use the following peripherals: |
| − | * | + | * IGEP COM PROTON |
| − | * | + | * An USB Cable mini-B |
| + | * USB Hub with external power supply | ||
| + | * A PC | ||
| − | + | = Getting started = | |
| + | == Power up IGEP COM PROTON == | ||
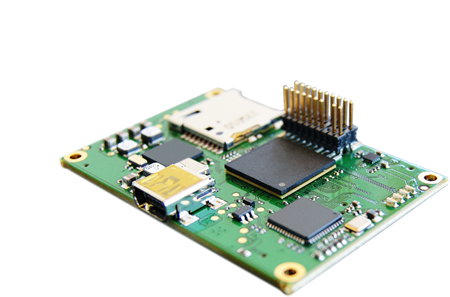
| + | [[Image:IGEP_COM_PROTON_with_HUB.JPG|right|200px]]IGEP COM PROTON for standalone operation (without expansion boards) can be supplied using a 5V DC through USB 2.0 OTG connector. Use an USB Hub with external power supply.<br><br><br><br><br><br><br><br> | ||
| − | + | == Log into IGEP COM PROTON via USB Ethernet Gadget interface == | |
| − | | | + | {{Message/Information Message|title=|message=In non-Linux operating system, use [http://labs.isee.biz/index.php/IGEP_SDK_Virtual_Machine IGEP SDK Virtual Machine] to connect to IGEP COM PROTON via USB}} |
| − | | | + | {{#lst:Using USB ethernet gadget to communicate|USB_linux}} |
| − | + | {{Navigation/IGEP Technology Guides/Getting Started/Ending | |
| − | + | |Next_Step={{#lst:Template:Links|IGEP_COM_PROTON_Community_Guides_2}} | |
| − | | | + | }} |
| − | |} | ||
| − | + | {{Table/IGEP Technology Devices | |
| − | + | |Tech_Family={{#lst:Template:Links|IGEP_COM_PROTON_Tech_Family}} | |
| − | + | |Tech_ID={{#lst:Template:Links|IGEP_COM_PROTON_Tech_ID}} | |
| − | |||
| − | |||
| − | |||
| − | |||
| − | = | ||
| − | |||
| − | |||
| − | { | ||
| − | | | ||
| − | | | ||
| − | |||
| − | |||
| − | |||
| − | |||
| − | |} | ||
| − | |||
| − | |||
| − | |||
| − | |||
| − | |||
| − | |||
| − | |||
| − | |||
| − | |||
| − | |||
| − | |||
| − | |||
| − | |||
| − | |||
| − | |||
| − | |||
| − | |||
| − | |||
| − | |||
| − | |||
| − | |||
| − | |||
| − | |||
| − | |||
| − | |||
| − | |||
| − | |||
| − | |||
| − | |||
| − | |||
| − | |||
| − | |||
| − | |||
| − | |||
| − | |||
| − | |||
| − | |||
| − | |||
| − | |||
| − | |||
| − | |||
| − | |||
| − | |||
| − | |||
| − | |||
| − | |||
| − | |||
| − | |||
| − | |||
| − | |||
| − | |||
| − | |||
| − | |||
| − | |||
| − | |||
| − | |||
| − | |||
| − | |||
| − | |||
| − | |||
| − | |||
| − | |||
| − | |||
| − | |||
| − | |||
| − | |||
| − | |||
| − | |||
| − | |||
| − | |||
| − | |||
| − | |||
| − | |||
| − | |||
| − | |||
| − | |||
| − | |||
| − | |||
| − | |||
| − | |||
|Name={{#lst:Template:Links|IGEP_COM_PROTON_Name}} | |Name={{#lst:Template:Links|IGEP_COM_PROTON_Name}} | ||
| − | | | + | |Image={{#lst:Template:Links|IGEP_COM_PROTON_Image}} |
| − | | | + | |ISEE_MainPage={{#lst:Template:Links|IGEP_COM_PROTON_ISEE_MainPage}} |
| + | |ISEE_Hardware={{#lst:Template:Links|IGEP_COM_PROTON_ISEE_Hardware}} | ||
}} | }} | ||
[[Category:IGEP Technology Devices Guides]] | [[Category:IGEP Technology Devices Guides]] | ||
| − | |||
Revision as of 17:07, 28 August 2012
|
|
Contents
Overview
This is the 1/3 chapter of IGEP COM PROTON Tutorial Guide.
In this first chapter, we will learn how to connect IGEP COM PROTON and how to log into IGEP COM PROTON via USB.
Requirements
In this tutorial we are going to use the following peripherals:
- IGEP COM PROTON
- An USB Cable mini-B
- USB Hub with external power supply
- A PC
Getting started
Power up IGEP COM PROTON

Log into IGEP COM PROTON via USB Ethernet Gadget interface

|
In non-Linux operating system, use IGEP SDK Virtual Machine to connect to IGEP COM PROTON via USB |
- In the file /etc/network/interfaces, you should add:
iface usb0 inet dhcp
- Plug an USB Type-A to USB Type-A mini cable between your host PC and the USB OTG from IGEP device. Use a powered USB Hub if you use IGEP COM MODULE or PROTON Board.
- If you use IGEP SDK VM you need to attach the removable device RNDIS driver.
- Type in a terminal:
sudo ifup usb0
- Revise that:
jdoe@ubuntu ~ $ ifconfig
...
usb0      Link encap:Ethernet  HWaddr 66:cc:f2:be:51:b6
          inet addr:192.168.7.10  Bcast:192.168.7.255  Mask:255.255.255.0
          inet6 addr: fe80::64cc:f2ff:febe:51b6/64 Scope:Link
          UP BROADCAST RUNNING MULTICAST  MTU:1500  Metric:1
          RX packets:14 errors:0 dropped:0 overruns:0 frame:0
          TX packets:44 errors:0 dropped:0 overruns:0 carrier:0
          collisions:0 txqueuelen:1000
          RX bytes:2496 (2.4 KB)  TX bytes:8794 (8.7 KB)
...
- Connect to IGEP device
jdoe@ubuntu ~ $ ssh root@192.168.7.1
The authenticity of host '192.168.7.1 (192.168.7.1)' can't be established.
ECDSA key fingerprint is 80:be:2d:b6:fe:b1:09:c3:3b:ac:0f:1d:f2:43:f2:20.
Are you sure you want to continue connecting (yes/no)? yes
Warning: Permanently added '192.168.7.1' (ECDSA) to the list of known hosts.
root@igep00x0:~# uname -a
Linux igep00x0 2.6.37 #1 Thu Jul 19 09:07:47 CEST 2012 armv7l GNU/Linux
root@igep00x0:~#
You have successfully completed this chapter of the guide.
|

|
If you have any question, don't ask to ask at the IGEP Community Forum or the IGEP Community Chat | 
|
|
|