


Difference between revisions of "Getting started with IGEP NEW YORK"
From IGEP - ISEE Wiki
m |
|||
| Line 47: | Line 47: | ||
<pre>;buddy = base0010 buddy.revision=B | <pre>;buddy = base0010 buddy.revision=B | ||
buddy=ilms0015</pre> | buddy=ilms0015</pre> | ||
| + | |||
| + | == How to identify New York revisions == | ||
| + | |||
| + | IGEP New York has two different revisions: ILMS0015-RA1 and ILMS0015-RA2. It is important to know which revision you possess, because RA2 can be powered at 5Vdc, while RA1 doesn't (as it was designed to be powered by connecting it to an ILMS0010), so it can be harmful for the board. | ||
| + | You can identify RA1 because it has two connectors on each side of the board, while RA2 has only two connectors on one side (it has the pads on the other side, but they aren't populated). | ||
| + | |||
| + | == How to upgrade ILMS0015-RA1 to ILMS0015-RA2 == | ||
| + | {{Message/Warning Message|title=Disclaimer|message=Modifying your board automatically removes any kind of guaranty. Do it at your own risk.}} | ||
| + | |||
| + | To upgrade your IGEP New York to revision RA2, in order to power your board through the accessible pins, you must solder a 4.7Vdc zener diode between TP1 and ground (nearest ground is the one from MOSFET Q1's drain) to act as a linear voltage regulator. The way to do it is by soldering the zener's cathode (marked with a strip) to TP1 and the diode's anode to ground (Q1's drain pad). | ||
== Remote connection via USB Ethernet Gadget == | == Remote connection via USB Ethernet Gadget == | ||
Revision as of 13:15, 26 January 2015
| |
| |||||||||
Overview
This is the 1/3 chapter of IGEP NEW YORK Expansion Tutorial Guide.
In this first chapter, we will learn how to connect some expansion peripherals.
Contents
[hide]- 1 Overview
- 2 Requirements
- 3 Getting started
- 3.1 Connect IGEP NEW YORK Expansion with IGEP COM MODULE/NEUTRON Board
- 3.2 Connect IGEP NEW YORK Expansion with IGEP COM PROTON Board
- 3.3 Enable IGEP NEW YORK Expansion support
- 3.4 How to identify New York revisions
- 3.5 How to upgrade ILMS0015-RA1 to ILMS0015-RA2
- 3.6 Remote connection via USB Ethernet Gadget
Requirements
In this tutorial we are going to use the following peripherals:
- IGEP COM MODULE or IGEP COM PROTON
- IGEP NEW YORK Expansion
- USB Standard-A to Mini-B type cable
- Powered USB HUB 2.0
- PC
Getting started
Connect IGEP NEW YORK Expansion with IGEP COM MODULE/NEUTRON Board

The IGEP NEW YORK Expansion connects to the IGEP COM MODULE/NEUTRON Board through J1 and J4 connectors. Just take a look on the figure below to mount it:
Connect IGEP NEW YORK Expansion with IGEP COM PROTON Board

The IGEP NEW YORK Expansion connects to the IGEP COM PROTON Board through J1 and J4 connectors. Just take a look on the figure below to mount it:
Enable IGEP NEW YORK Expansion support
IGEP Yocto Firmware doesn't come with IGEP BERLIN Expansion support. Edit igep.ini file to configure it, you can do this adding following kernel cmdline parameter
;buddy = base0010 buddy.revision=B
buddy=ilms0015
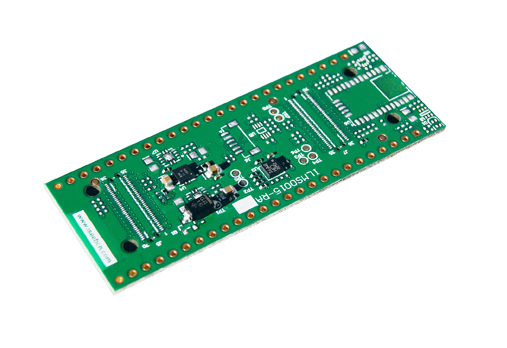
How to identify New York revisions
IGEP New York has two different revisions: ILMS0015-RA1 and ILMS0015-RA2. It is important to know which revision you possess, because RA2 can be powered at 5Vdc, while RA1 doesn't (as it was designed to be powered by connecting it to an ILMS0010), so it can be harmful for the board. You can identify RA1 because it has two connectors on each side of the board, while RA2 has only two connectors on one side (it has the pads on the other side, but they aren't populated).
How to upgrade ILMS0015-RA1 to ILMS0015-RA2
| |
Modifying your board automatically removes any kind of guaranty. Do it at your own risk. |
To upgrade your IGEP New York to revision RA2, in order to power your board through the accessible pins, you must solder a 4.7Vdc zener diode between TP1 and ground (nearest ground is the one from MOSFET Q1's drain) to act as a linear voltage regulator. The way to do it is by soldering the zener's cathode (marked with a strip) to TP1 and the diode's anode to ground (Q1's drain pad).
Remote connection via USB Ethernet Gadget

|
If you aren't using a Linux operating system, use IGEP SDK Virtual Machine to connect to the board |
In your Host Machine, open a terminal session and connect to the board using the SSH protocol,
$ ssh root@192.168.7.1
an empty password for root user should work to access to the shell prompt.
If you're experiencing some problems connecting to the board try with following guide : Using USB ethernet gadget to communicate
You have successfully completed this chapter of the guide.
| |

|
If you have any question, don't ask to ask at the IGEP Community Forum or the IGEP Community Chat | 
|