Difference between revisions of "How to develop with Qt under IGEP Technology"
From IGEP - ISEE Wiki
m |
(→Download and install Qt demo image to a SD) |
||
| (7 intermediate revisions by 2 users not shown) | |||
| Line 1: | Line 1: | ||
== Overview == | == Overview == | ||
| − | <section begin=overview />This guide can be helpful to learnt to develop Qt applications under IGEP Boards. Qt is a cross-platform application framework that is widely used for developing application software with a graphical user interface, and also used for developing non-GUI programs such as command-line tools and consoles for servers. You can get more information [http://qt. | + | <section begin=overview />This guide can be helpful to learnt to develop Qt applications under IGEP Boards. Qt is a cross-platform application framework that is widely used for developing application software with a graphical user interface, and also used for developing non-GUI programs such as command-line tools and consoles for servers. You can get more information [http://qt.io/ here].<section end=overview /> |
| − | == Requirements | + | == Requirements == |
There are some requisites to follow this guide: | There are some requisites to follow this guide: | ||
| − | *[http://isee.biz/component/zoo/item/igep-virtual-machine-sdk-yocto IGEP SDK VM]: follow the IGEP SDK SOFTWARE USER MANUAL (chapter 2.3 "Setting up and running the VM")<br> | + | *[http://isee.biz/component/zoo/item/igep-virtual-machine-sdk-yocto IGEP SDK VM]: follow the [http://isee.biz/component/zoo/item/igep-sdk-software-user-manual IGEP SDK SOFTWARE USER MANUAL] (chapter 2.3 "Setting up and running the VM") or install [[How to install Qt Creator|Qt Creator]]<br> |
| − | *[http://downloads.isee.biz/denzil/binary/qt4e-demo-image-igep00x0.tar.bz2 IGEP Qt Demo]: follow the IGEP SDK SOFTWARE USER MANUAL (chapter 6.1 "Create IGEP firmware bootable micro-sd card") and install qt4e-demo-image-igep00x0.tar.bz2 instead IGEP firmware. | + | *[http://downloads.isee.biz/denzil/binary/qt4e-demo-image-igep00x0.tar.bz2 IGEP Qt Demo]: follow the [http://isee.biz/component/zoo/item/igep-sdk-software-user-manual IGEP SDK SOFTWARE USER MANUAL] (chapter 6.1 "Create IGEP firmware bootable micro-sd card") and install qt4e-demo-image-igep00x0.tar.bz2 instead IGEP firmware. |
| − | *[ | + | *[https://www.isee.biz/products/igep-processor-boards/igepv2-dm3730 IGEP v2], [https://www.isee.biz/products/igep-expansion-boards/igep-berlin IGEP BERLIN] or [https://www.isee.biz/products/igep-expansion-boards/igep-paris IGEP PARIS] |
| − | *MicroSD Card (at least 2Gbytes) | + | *MicroSD Card (at least 2Gbytes) |
| − | == Download and install Qt demo image to a SD | + | ==Download and install Qt demo image to a SD== |
| + | Once you have open IGEP SDK VM, launch a terminal and type: | ||
| − | |||
<pre>cd Desktop/ | <pre>cd Desktop/ | ||
| − | wget http://downloads.isee.biz/denzil/binary/qt4e-demo-image-igep00x0.tar.bz2 | + | wget http://downloads.isee.biz/denzil/binary/qt4e-demo-image-igep00x0.tar.bz2</pre> |
| − | git clone | + | <pre>git clone https://git.isee.biz/igep-tools/igep-tools.git</pre> |
| − | cd igep-tools/ | + | <pre>cd igep-tools/script</pre> |
| − | Insert a SD-Card media and use the igep-media-create script to copy the firmware to SD-Card media, required options are: | + | Insert a SD-Card media and use the igep-media-create script to copy the firmware to SD-Card media, required options are: |
| − | *--mmc </dev/sdX> | + | * --mmc </dev/sdX> |
| − | unformated MMC Card | + | unformated MMC Card |
| − | *--image <filename> | + | * --image <filename> |
| − | specify file used to create the bootable SD card. | + | specify file used to create the bootable SD card. |
| − | *--machine <machine> | + | * --machine <machine> |
| − | specify the machine. Options are igep0020, igep0030 or igep0032 | + | specify the machine. Options are igep0020, igep0030 or igep0032 |
| − | For example, assuming the SD card device takes "/dev/sdf" and you have and IGEPv2 board (igep0020), type: | + | For example, assuming the SD card device takes "/dev/sdf" and you have and IGEPv2 board (igep0020), type: |
| − | <pre>./igep-media-create --mmc /dev/sdf --machine igep0020 --image /home/jdoe/Desktop/qt4e-demo-image-igep00x0.tar.bz2</pre> | + | |
| − | This should give you a bootable SD-card | + | <pre>./igep-media-create --mmc /dev/sdf --machine igep0020 --image /home/jdoe/Desktop/qt4e-demo-image-igep00x0.tar.bz2</pre> |
| + | This should give you a bootable SD-card | ||
== Prepare Qt demo image == | == Prepare Qt demo image == | ||
| Line 67: | Line 68: | ||
==== Open an example:<br> ==== | ==== Open an example:<br> ==== | ||
| − | Copy your desired example from | + | Copy your desired example from (/opt/QtSDK/Examples/4.7 using VM or ~/QtSDK/Examples/4.7 default directory install) to your desktop.<br> |
| − | {| | + | {| cellspacing="1" cellpadding="1" width="200" border="1" |
|- | |- | ||
| [[Image:Qtcopyanexamplev2.png|496x373px]] | | [[Image:Qtcopyanexamplev2.png|496x373px]] | ||
| Line 80: | Line 81: | ||
Open this example with Qt Creator, set Desktop target and use for each Qt Version one debug and one release | Open this example with Qt Creator, set Desktop target and use for each Qt Version one debug and one release | ||
| − | {| | + | {| cellspacing="1" cellpadding="1" width="757" border="1" |
|- | |- | ||
| [[Image:Qtopenanexamplev2.png|250x188px]] | | [[Image:Qtopenanexamplev2.png|250x188px]] | ||
Latest revision as of 11:03, 21 September 2018
Contents
Overview
This guide can be helpful to learnt to develop Qt applications under IGEP Boards. Qt is a cross-platform application framework that is widely used for developing application software with a graphical user interface, and also used for developing non-GUI programs such as command-line tools and consoles for servers. You can get more information here.
Requirements
There are some requisites to follow this guide:
- IGEP SDK VM: follow the IGEP SDK SOFTWARE USER MANUAL (chapter 2.3 "Setting up and running the VM") or install Qt Creator
- IGEP Qt Demo: follow the IGEP SDK SOFTWARE USER MANUAL (chapter 6.1 "Create IGEP firmware bootable micro-sd card") and install qt4e-demo-image-igep00x0.tar.bz2 instead IGEP firmware.
- IGEP v2, IGEP BERLIN or IGEP PARIS
- MicroSD Card (at least 2Gbytes)
Download and install Qt demo image to a SD
Once you have open IGEP SDK VM, launch a terminal and type:
cd Desktop/
wget http://downloads.isee.biz/denzil/binary/qt4e-demo-image-igep00x0.tar.bz2
git clone https://git.isee.biz/igep-tools/igep-tools.git
cd igep-tools/script
Insert a SD-Card media and use the igep-media-create script to copy the firmware to SD-Card media, required options are:
- --mmc </dev/sdX>
unformated MMC Card
- --image <filename>
specify file used to create the bootable SD card.
- --machine <machine>
specify the machine. Options are igep0020, igep0030 or igep0032
For example, assuming the SD card device takes "/dev/sdf" and you have and IGEPv2 board (igep0020), type:
./igep-media-create --mmc /dev/sdf --machine igep0020 --image /home/jdoe/Desktop/qt4e-demo-image-igep00x0.tar.bz2
This should give you a bootable SD-card
Prepare Qt demo image
Qt demo image is a root filesystem build by Yocto that contains Qt embedded libraries, also this image has some Qt examples for testing purposes.
This image doesn't have openssh and gdbserver, so we should install these packages to develop Qt applications. Open a shell prompt using serial communication (IGEP SDK SOFTWARE MANUAL chapter 3.1 "Using serial mode") and type the following commands:
zypper ref
zypper in openssh
zypper in gdbserver
Now you can connect between IGEP and VM using SSH protocol:
ssh root@"IGEP IP for example: 192.168.5.1"
Using Qt Creator
First Steps
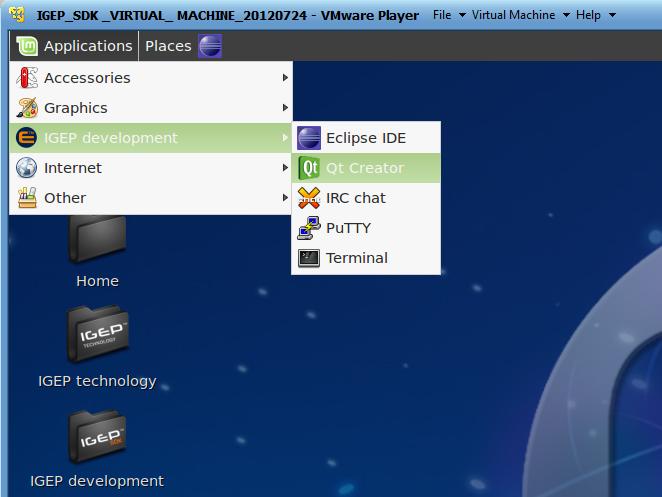
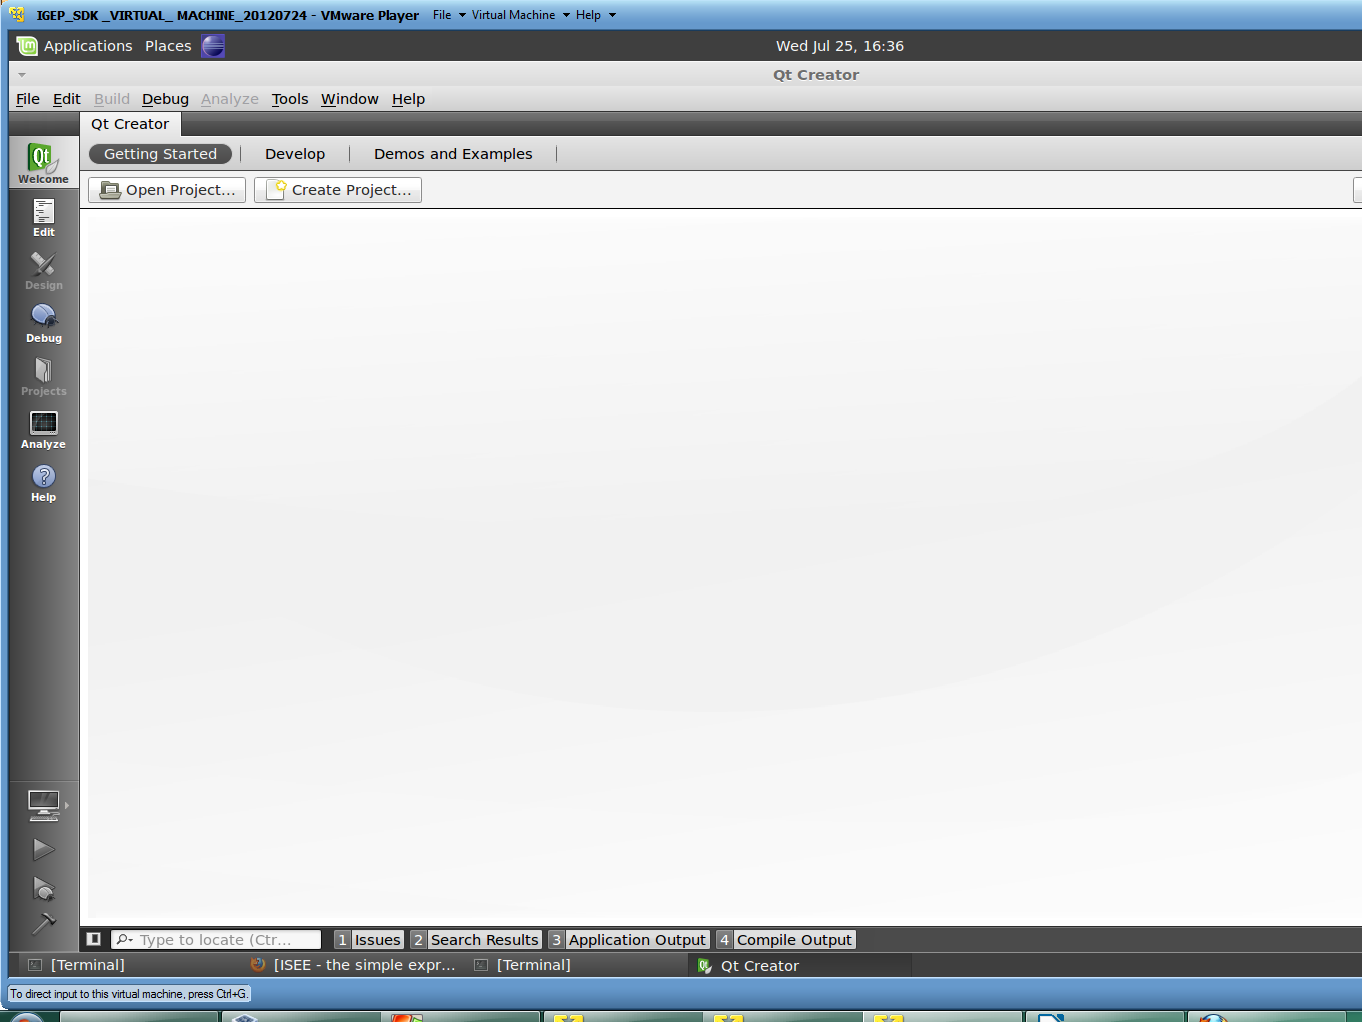
Open Program:
Go to Applications -> IGEP development -> Qt Creator
 |
 |
Click to enlarge image
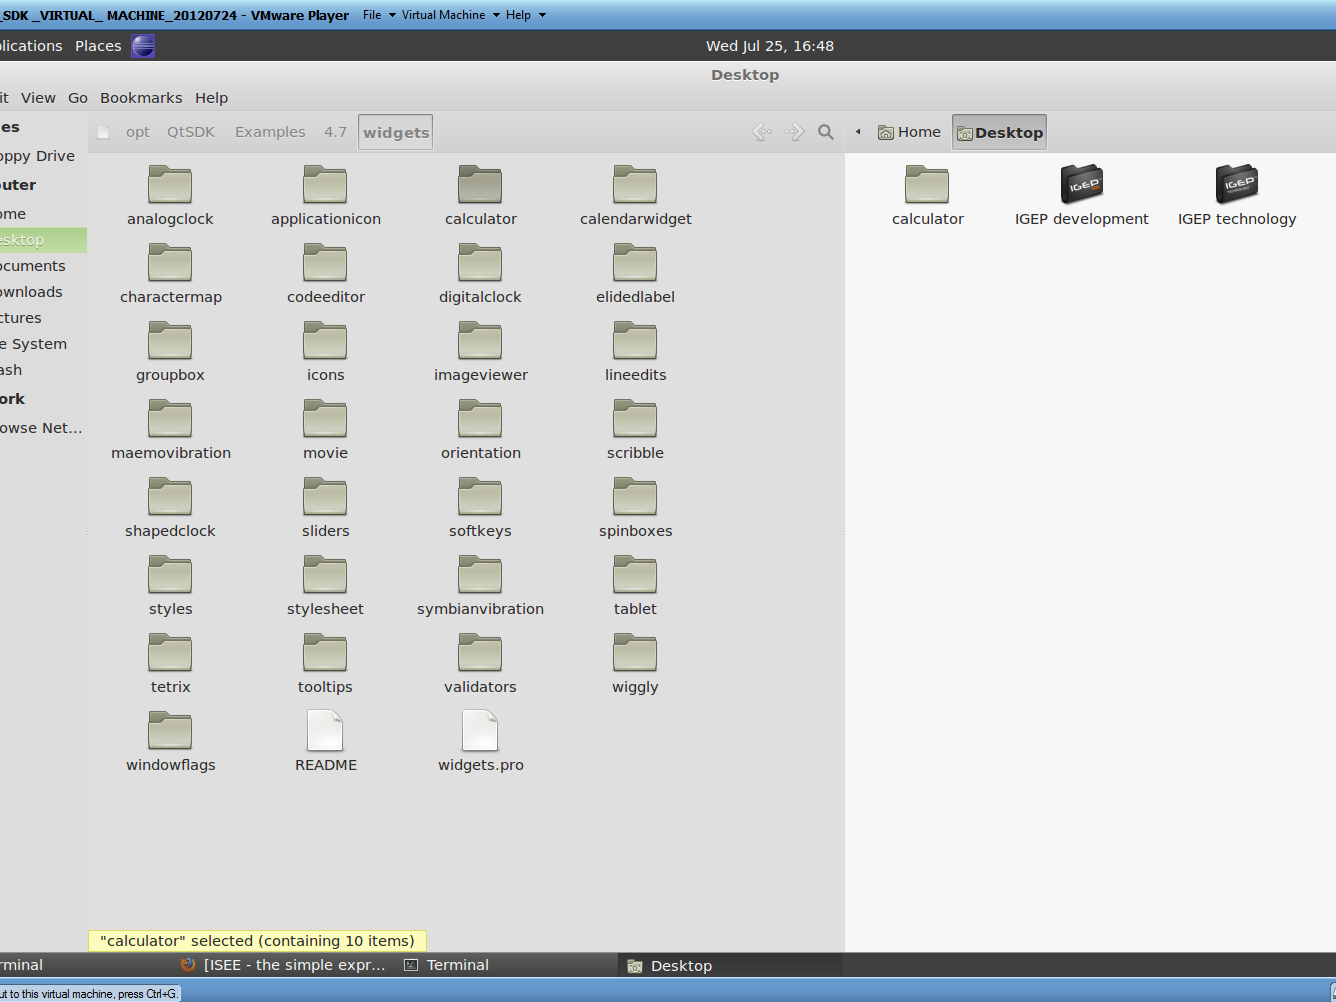
Open an example:
Copy your desired example from (/opt/QtSDK/Examples/4.7 using VM or ~/QtSDK/Examples/4.7 default directory install) to your desktop.
|
Click to enlarge image
NOTE: some examples (like hellogl) cannot be compiled to ARM, for this How-to is used calculator example.
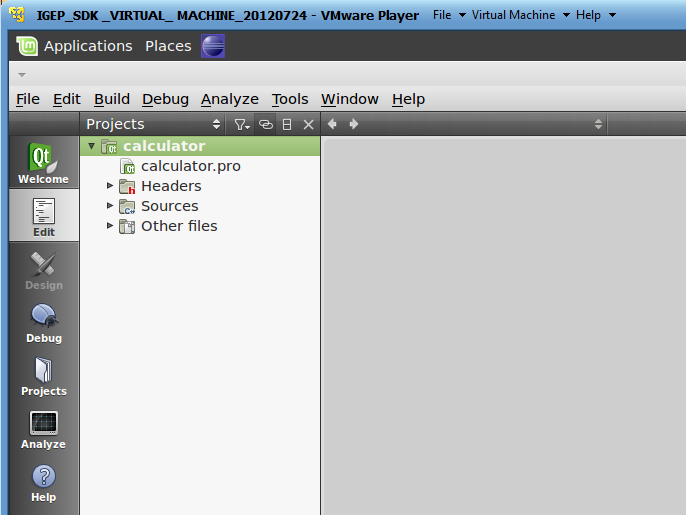
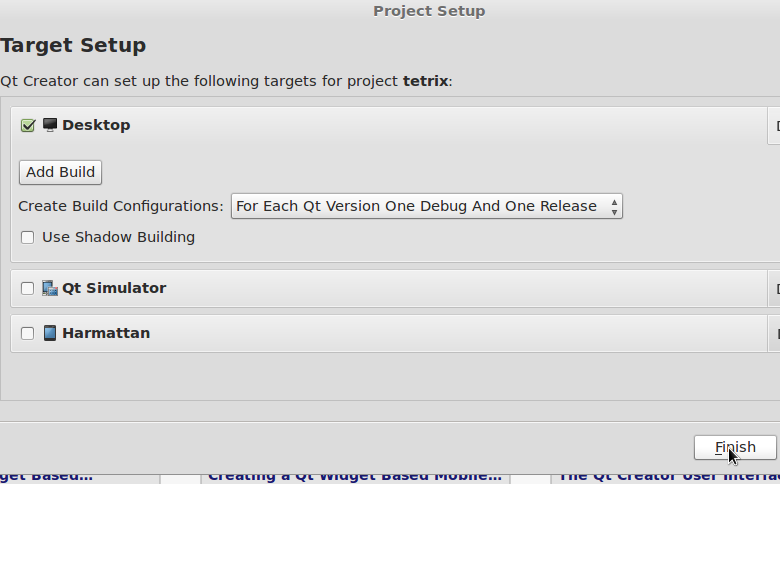
Open this example with Qt Creator, set Desktop target and use for each Qt Version one debug and one release

|
|
|
Click to enlarge image
ARM Platform
Build Programs
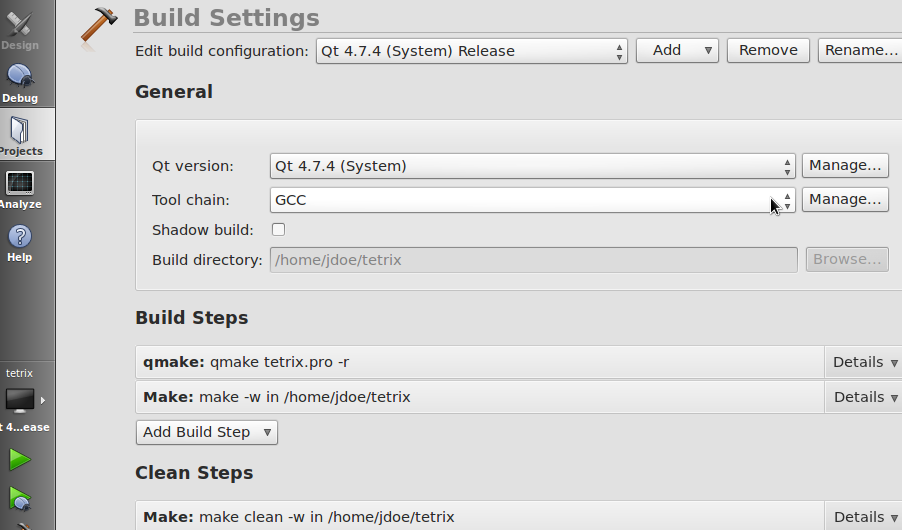
To compile to ARM for IGEP go to Project use the following configuration at Projects field -> Build:
|
Click to enlarge image
NOTE: Use Debug build if you want to debug later
Compile with: Build->Clean All and Build->Build All (Ctrl+Shift+B).
Run Programs
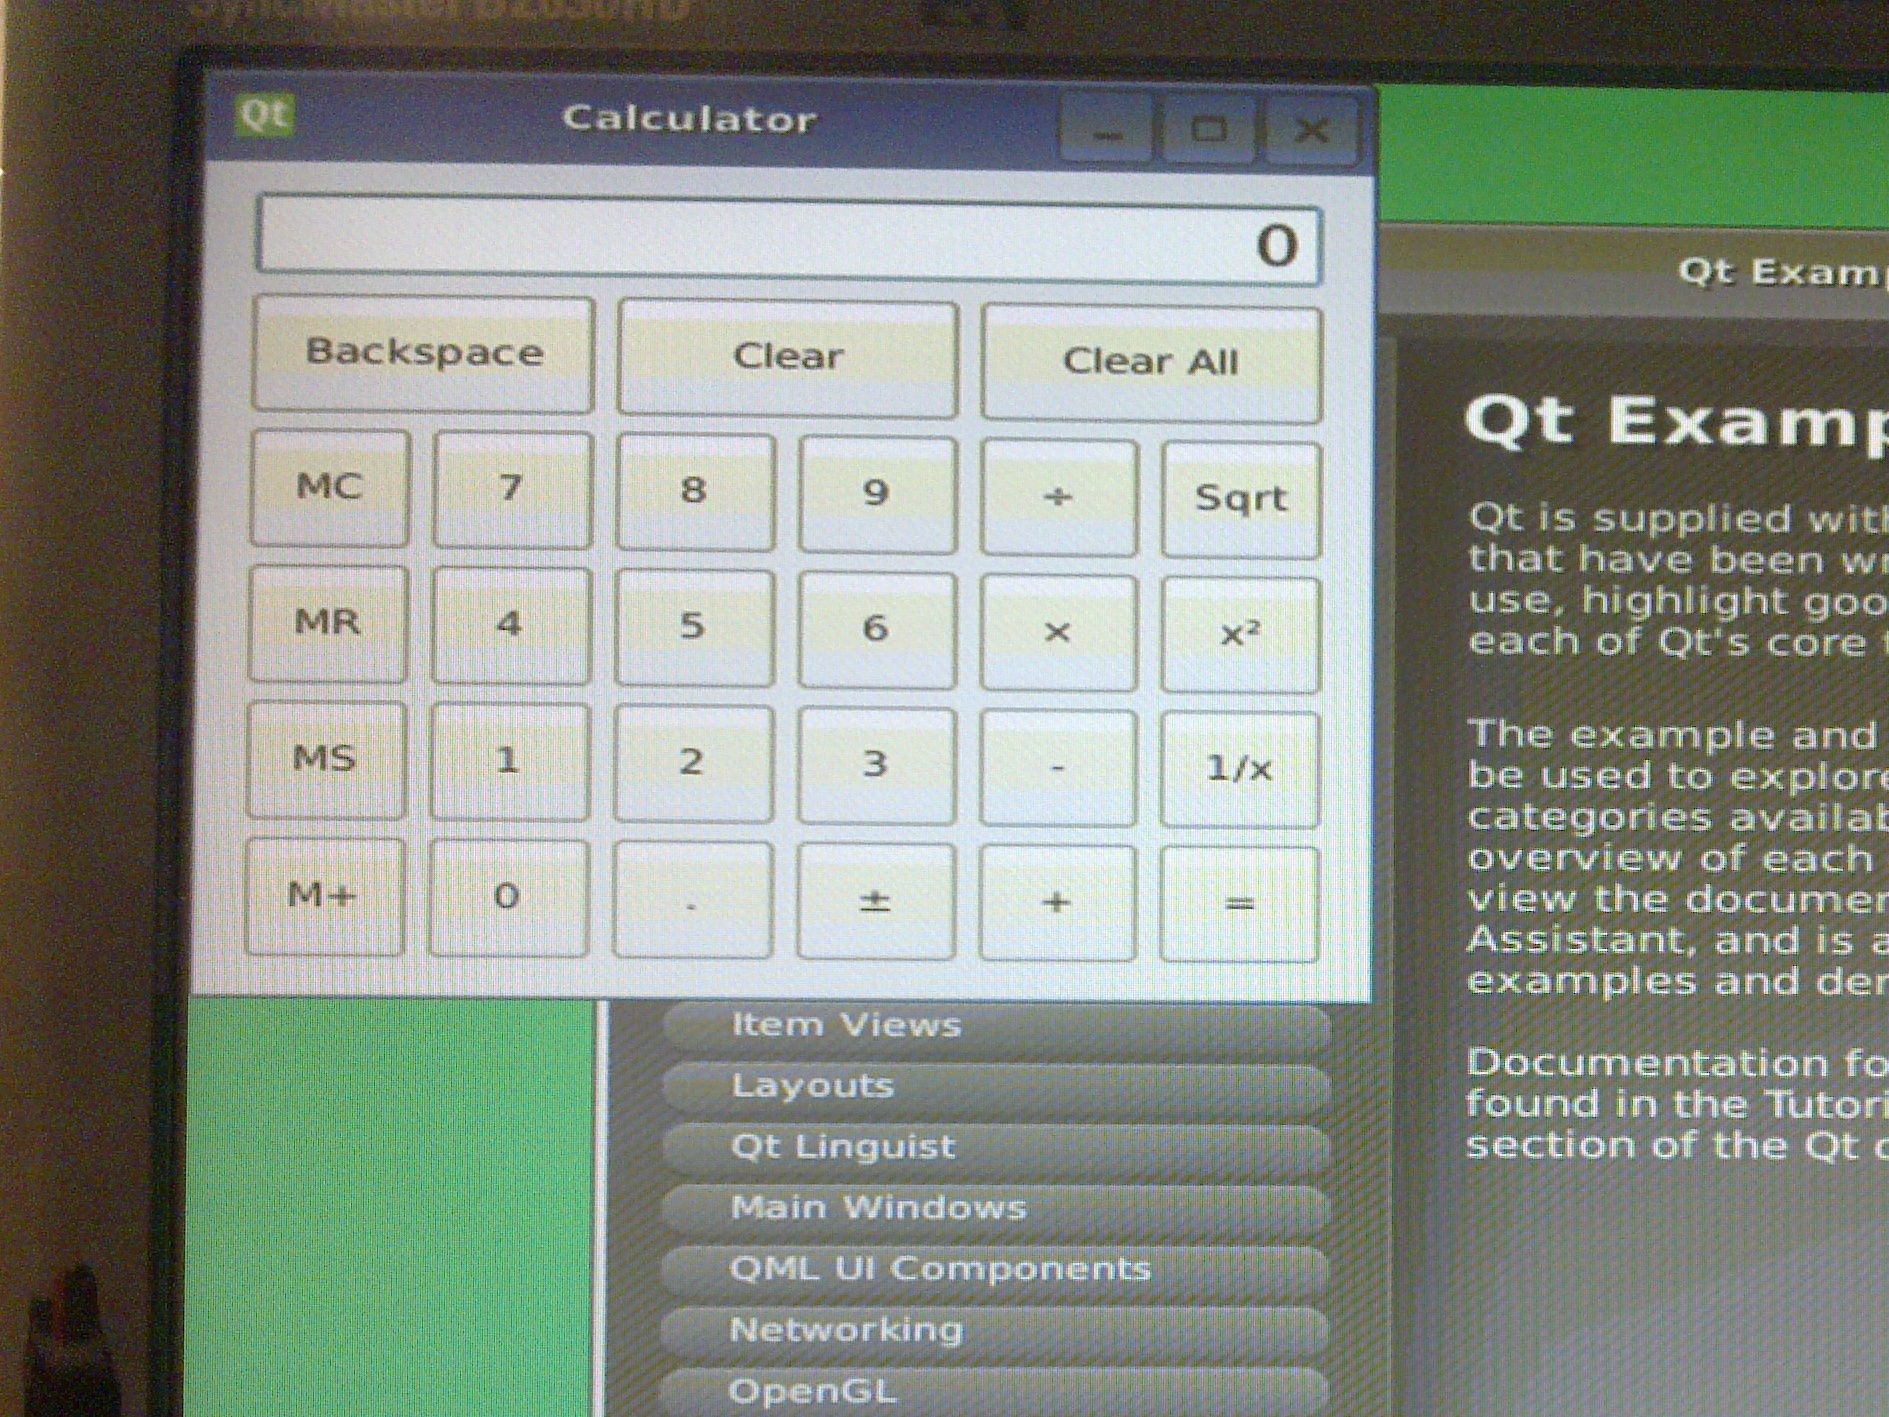
Once you compiled the program pass it from VM to IGEP via SSH, launch a terminal and type:
scp "pathtobinary" root@"IGEP IP for example: 192.168.5.1":/home/root
Get a remote shell prompt and run your program:
ssh root@"IGEP IP for example: 192.168.5.1"
./"binary"  "optional:arguments"
|
Click to enlarge image
NOTE: You cannot use igep-remote-x program because Qt-demo image doesn't have X installed.
Debug Programs
NOTE: When you debug programs using Qt Creator "Step in" and "Step Out" are not supported, because dinamic libraries symbols are not loaded by gdb.
Once you compiled the program pass it from VM to IGEP via SSH, launch a terminal and type:
scp "pathtobinary" root@"IGEP IP for example: 192.168.5.1":/home/root
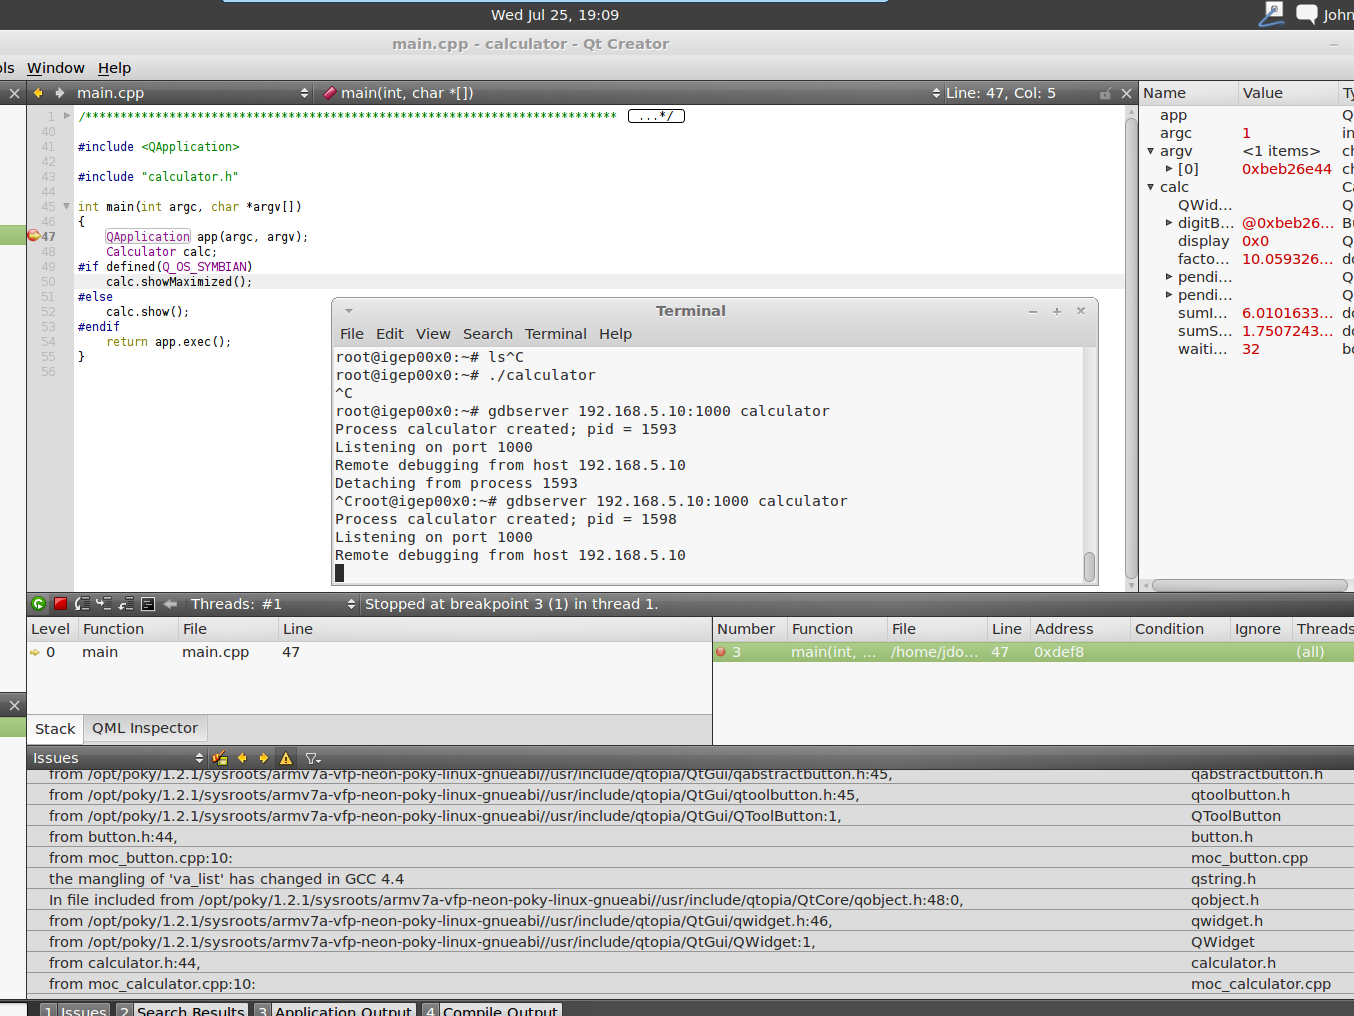
Get a remote shell prompt and run gdbserver:
ssh root@"IGEP IP for example: 192.168.5.1"
gdbserver "VM IP for example: 192.168.5.10":1000 "pathtobinary" "optional:armguments"
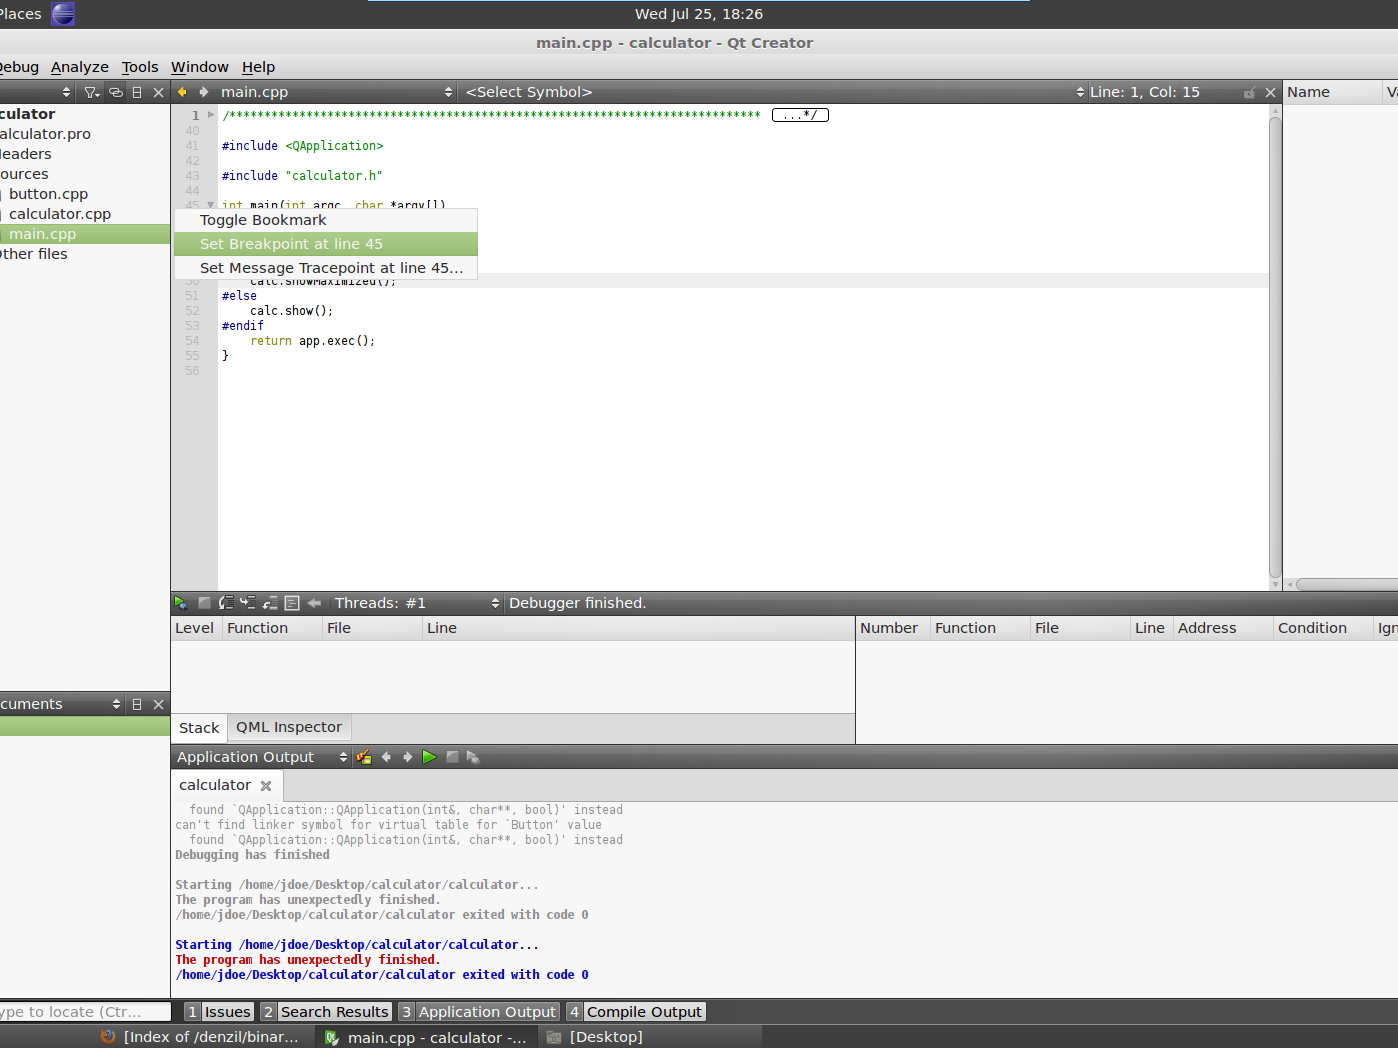
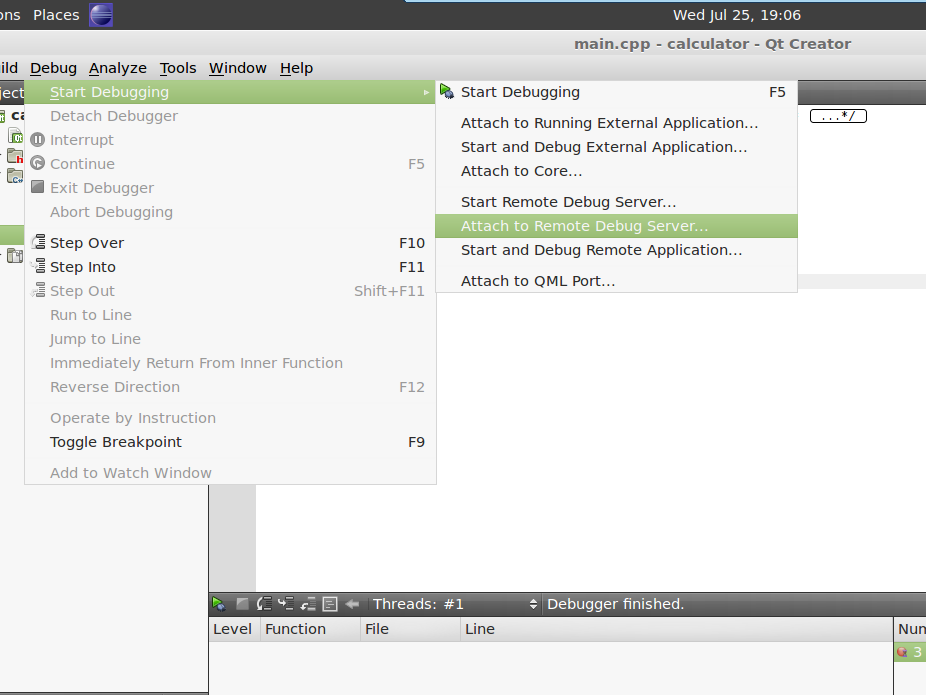
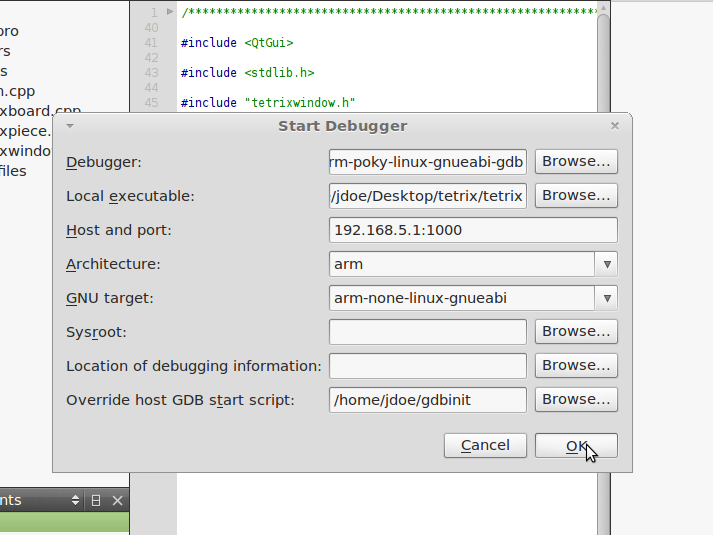
Now use the followings steps to debug program:
|
|
|
|
Click to enlarge image
Image 1: set breakpoints in your source code
Image 3: use the following configuration:
- Debugger: /opt/poky/1.2/sysroots/i686-pokysdk-linux/usr/bin/armv7a-vfp-neon-poky-linux-gnueabi/arm-poky-linux-gnueabi-gdb
- Local executable: "pathtohostbinary"
- Host and port: "IGEP IP for example: 192.168.5.1":1000
- Architecture: arm
- GNU target: arm-none-linux-gnueabi
- Sysroot: (empty)
- Location of debugging information: (empty)
- Override host GDB start script: download gdbinit file, uncompress to home folder and select it (/home/jdoe/gdbinit)
NOTE: You cannot use igep-remote-x program because Qt-demo image doesn't have X installed.
x86 Platform
Build Programs
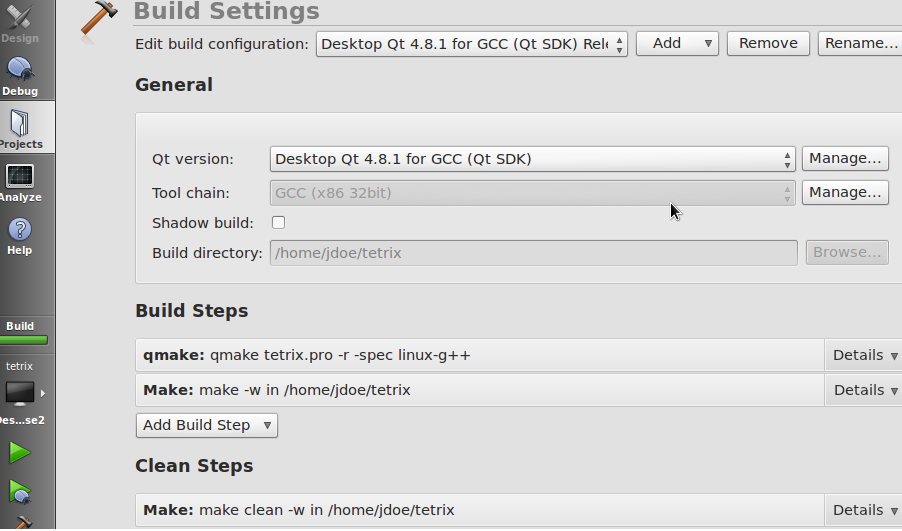
To compile to x86 go to Project use the following configuration at Projects field -> Build:
|
Click to enlarge image
NOTE: Use Debug build if you want to debug later
Compile with: Build->Clean All and Build->Build All (Ctrl+Shift+B).
Run Programs
Use run button (Ctrl+R).
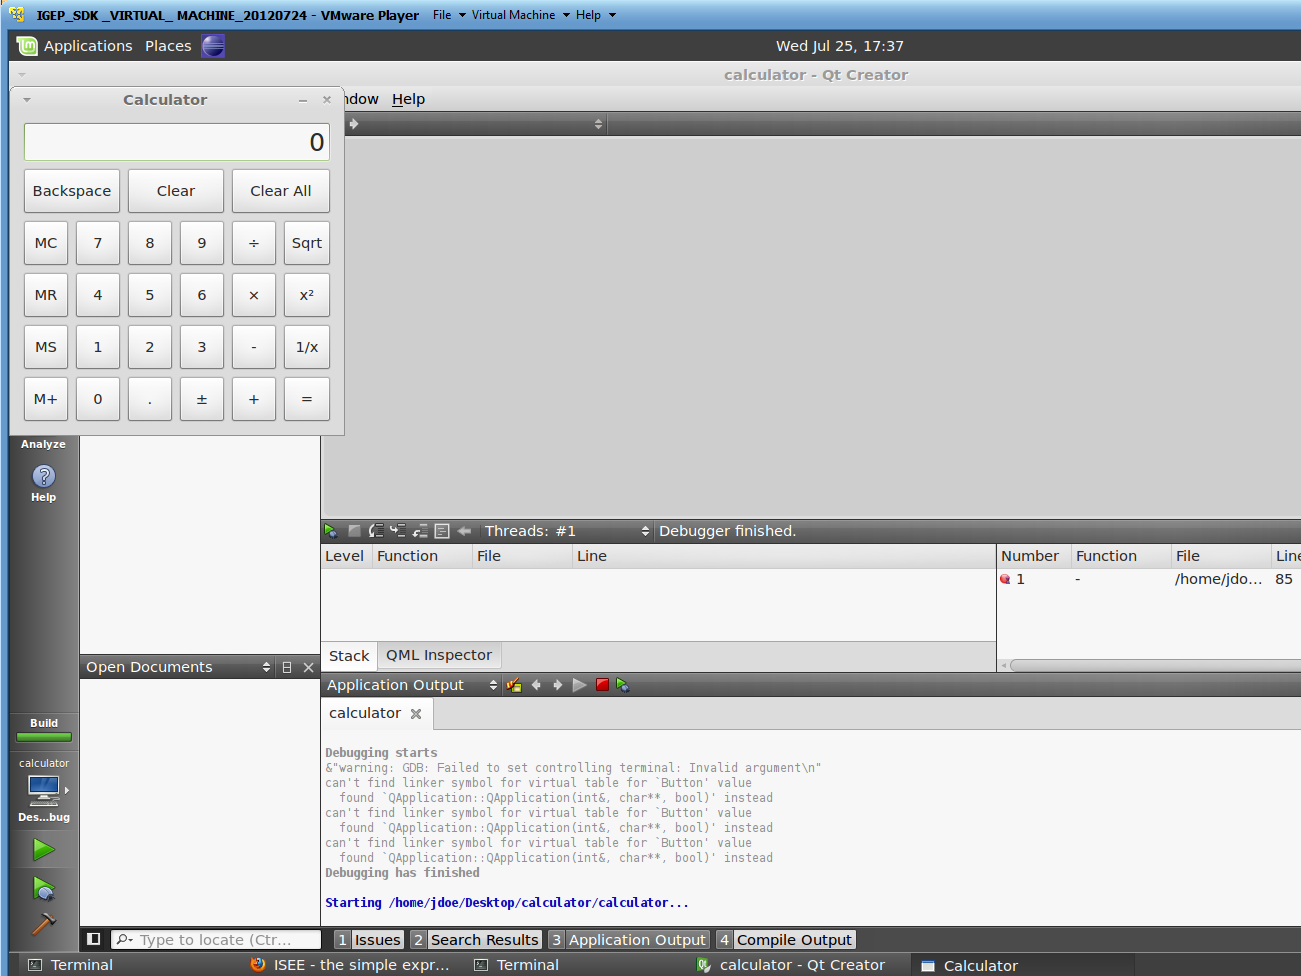
|
Click to enlarge image
Debug Programs
Set breakpoints in your source code and press debug button (F5)

|
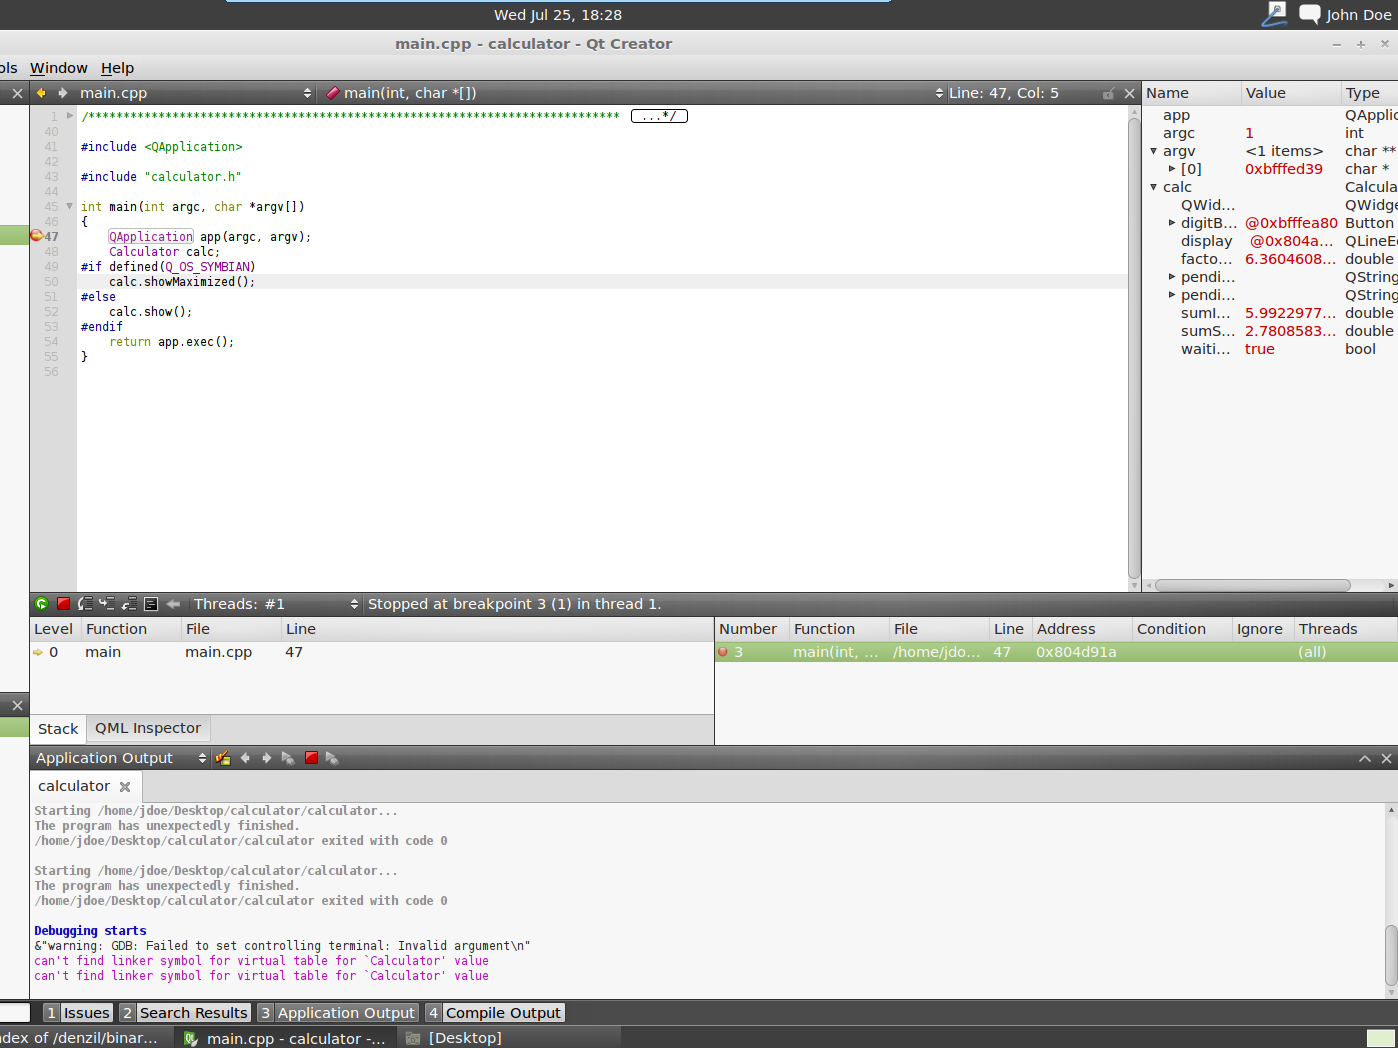
|
Click to enlarge image


