

Difference between revisions of "Getting started with IGEPv2 EXPANSION"
From IGEP - ISEE Wiki
m |
|||
| Line 1: | Line 1: | ||
| − | + | = Getting started with IGEPv2 Expansion<br> = | |
{{Table/IGEP Technology Devices | {{Table/IGEP Technology Devices | ||
| Line 8: | Line 8: | ||
|ISEE_MainPage={{#lst:Template:Links|IGEPv2_EXPANSION_ISEE_MainPage}} | |ISEE_MainPage={{#lst:Template:Links|IGEPv2_EXPANSION_ISEE_MainPage}} | ||
|ISEE_Hardware={{#lst:Template:Links|IGEPv2_EXPANSION_ISEE_Hardware}} | |ISEE_Hardware={{#lst:Template:Links|IGEPv2_EXPANSION_ISEE_Hardware}} | ||
| − | }} | + | }} |
| + | <br> __TOC__ | ||
| − | + | = Overview = | |
| + | This is the 1/3 chapter of IGEPv2 Expansion Tutorial Guide. | ||
| − | + | In this first chapter, we will learn how to connect some expansion peripherals. | |
| − | + | = Requirements = | |
| − | + | In these tutorials we are going to need the following components : | |
| − | <br> | + | *[http://www.isee.biz/products/processor-boards/igepv2-board IGEPv2], [http://shop.isee.biz/buy-online/accesories/power-supply-2600ma-ac-6w.html +5V DC power supply], Ethernet cable and a PC with Linux or Windows.<br> |
| + | *Powertrip 4.3" or [http://shop.isee.biz/buy-online/accesories/tft-24-bits-seiko-7.html Seiko 7"] screen if you need a touch screen. | ||
| + | *DB9 connector and USB serial converter to follow serial communication tutorial<br> | ||
| + | *4 pin connector for CAN Bus with another IGEPv2 and Expansion to follow CAN Bus communication tutorial<br> | ||
| + | *SIM card with an antenna to follow Telit modem tutorial<br> | ||
| + | *Composite video cable, composite video output peripheral (PAL or NTSC) and a screen to follow TVP5151 tutorial<br> | ||
| − | + | = Getting started = | |
| − | + | == Connect IGEPv2 Expansion with IGEPv2 Board == | |
| − | + | '''Basic''' | |
| − | <br> | + | The IGEPv2 Expansion connects to the IGEPv2 Board through J990, JA41, JA42, JC30 and J960 connectors. Some IGEPv2 Expansion may include three jumpers, you should remove it because they are designed for test and lab purposes. Just take a look on the figure below to mount it:<br> |
| − | <br> | + | {| cellspacing="1" cellpadding="1" width="200" border="1" align="center" |
| + | |- | ||
| + | | [[Image:Igepv2expconnectoigepv2.PNG|268px]]<br> | ||
| + | | [[Image:Igepv2expconnectoigepv2 2.PNG|268px]]<br> | ||
| + | |} | ||
| − | + | == TFT and Touchscreen == | |
| − | + | '''Basic''' | |
| − | <br> | + | [[Image:IGEP0022 PROTO RA DSC 0142.JPG|right|200px]] IGEPv2 Expansion integrates a LCD backlight driver (Texas instruments TPS61081) and touch screen controller (Texas instruments TSC2046), 4-wire touch screen controller which supports a low-voltage I/O interface which can be directly connected to a SEIKO 7” LCD or to a POWERTIP 4.3” LCD. Use J301 connector for POWERTRIP 4.3" or use J302, J303 and J304 connector for SEIKO 7".<br> |
| − | <br> | + | '''Know more'''<br> |
| − | + | IGEPv2 Expansion integrates LCD backlight driver (TPS61081) and touch screen controller (TSC2046), a 4-wire touch screen controller which supports a low voltage I/O interface from 1.5V to 5.25V. | |
| − | = | + | == Serial port == |
| − | + | '''Basic''' [[Image:Igepv2expdb9connector.PNG|right|200px]] | |
| − | + | IGEPv2 Expansion integrates a DB9 RS232 connector. Plug a DB9 cable. <br> | |
| − | + | '''Know more''' | |
| − | <br> | + | This peripheral (UART 3) can be used to debug system using kernel traces, getting a remote prompt, etc. <br> <br> <br> |
| − | + | == VGA monitor == | |
| − | |||
| − | |||
| − | |||
| − | |||
| − | |||
| − | |||
| − | + | '''Basic''' | |
| − | |||
| − | | | + | {| cellspacing="1" cellpadding="1" width="363" border="1" align="right" |
|- | |- | ||
| − | | | + | | [[Image:Igepv2expconnecttovga.jpg|150px]] |
| − | + | | [[Image:Igepv2expvgaconnector.PNG|200px]] | |
| + | |} | ||
| − | + | IGEPv2 Expansion integrates a VGA connector, the output VGA signal is equal to HDMI connector. Plug a monitor with VGA input. | |
| − | + | '''Know more''' | |
| − | + | ||
| + | This output is controled by ADV7125KSTZ140 Integrated Circuit. | ||
| − | <br> | + | <br> <br> <br> |
| − | + | == CAN bus == | |
| − | + | '''Basic''' | |
| − | + | [[Image:Igepv2expcanconnector.PNG|right|200px]]IGEPv2 Expansion integrates a CAN peripheral. Connect any CAN bus device or network to the CAN bus connector (J703).<br> | |
| − | + | '''Know more''' | |
| − | + | This output is controled by MICROCHIP MCP2515. J703 is a 3.5 mm pitch terminal blocks 4 Positions: | |
| − | == CAN | + | {| cellspacing="1" cellpadding="1" width="350" border="1" |
| + | |- | ||
| + | | Signal Name | ||
| + | | Pin #<br> | ||
| + | | Description | ||
| + | |- | ||
| + | | VDD_CAN | ||
| + | | J703:1 | ||
| + | | Supply Voltage (+5V DC) | ||
| + | |- | ||
| + | | CANL | ||
| + | | J703:2 | ||
| + | | CAN Low-Level Voltage I/O | ||
| + | |- | ||
| + | | GND | ||
| + | | J703:3 | ||
| + | | Ground | ||
| + | |- | ||
| + | | CANH | ||
| + | | J703:4 | ||
| + | | CAN High-Level Voltage I/O | ||
| + | |} | ||
| + | |||
| + | == GSM/GPRS modem == | ||
| − | + | '''Basic''' | |
| − | == SIM card reader | + | {| cellspacing="1" cellpadding="1" width="200" border="1" align="right" |
| + | |- | ||
| + | | [[Image:IGEP0022 Modem with antenna.png|200px]] | ||
| + | | [[Image:Igepv2expcardreader.PNG|right|200px]] | ||
| + | |- | ||
| + | | GSM-GPRS antenna (highly recommended) | ||
| + | | SIM card reader | ||
| + | |} | ||
| − | + | IGEPv2 Expansion integrates a GSM/GPRS modem to make phone calls or to send SMS or to write and read data from it, etc.<br> | |
| − | + | '''Know more''' Modem chip Telit GE865 is a small GSM/GPRS Ball-Grid-Array BGA module with next main features: | |
| − | + | *Quad-band EGSM 850 / 900 / 1800 / 1900 MHz | |
| + | *Power consumption (typical values) | ||
| − | + | - Power off: ‹ 62 uA<br> - Idle (registered, power saving): 1.6 mA @ DRX=9 <br> <br> <br> | |
| − | == | + | == Composite Video Decoder == |
| − | + | '''Basic''' | |
| − | [[Image: | + | [[Image:Igepv2expvideocompositeconnector.PNG|right|200px]]IGEPv2 Expansion integrates two composite video connectors to decode analog input signal. Plug some peripheral with video composite output.<br> |
| − | + | '''Know more''' | |
| − | + | Analog input is decoded by TVP5151. | |
| + | <br> {{Navigation/IGEP Technology Guides/Getting Started/Ending | ||
| + | |Next_Step={{#lst:Template:Links|IGEPv2_EXPANSION_Community_Guides_2}} | ||
| + | }} | ||
| − | {{ | + | {{Table/IGEP Technology Devices |
| + | |Tech_Family={{#lst:Template:Links|IGEPv2_EXPANSION_Tech_Family}} | ||
| + | |Tech_ID={{#lst:Template:Links|IGEPv2_EXPANSION_Tech_ID}} | ||
|Name={{#lst:Template:Links|IGEPv2_EXPANSION_Name}} | |Name={{#lst:Template:Links|IGEPv2_EXPANSION_Name}} | ||
| − | | | + | |Image={{#lst:Template:Links|IGEPv2_EXPANSION_Image}} |
| − | | | + | |ISEE_MainPage={{#lst:Template:Links|IGEPv2_EXPANSION_ISEE_MainPage}} |
| + | |ISEE_Hardware={{#lst:Template:Links|IGEPv2_EXPANSION_ISEE_Hardware}} | ||
}} | }} | ||
| − | |||
| − | |||
Revision as of 10:12, 27 August 2012
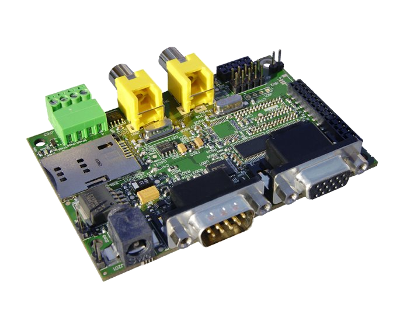
Getting started with IGEPv2 Expansion
|
|
Contents
Overview
This is the 1/3 chapter of IGEPv2 Expansion Tutorial Guide.
In this first chapter, we will learn how to connect some expansion peripherals.
Requirements
In these tutorials we are going to need the following components :
- IGEPv2, +5V DC power supply, Ethernet cable and a PC with Linux or Windows.
- Powertrip 4.3" or Seiko 7" screen if you need a touch screen.
- DB9 connector and USB serial converter to follow serial communication tutorial
- 4 pin connector for CAN Bus with another IGEPv2 and Expansion to follow CAN Bus communication tutorial
- SIM card with an antenna to follow Telit modem tutorial
- Composite video cable, composite video output peripheral (PAL or NTSC) and a screen to follow TVP5151 tutorial
Getting started
Connect IGEPv2 Expansion with IGEPv2 Board
Basic
The IGEPv2 Expansion connects to the IGEPv2 Board through J990, JA41, JA42, JC30 and J960 connectors. Some IGEPv2 Expansion may include three jumpers, you should remove it because they are designed for test and lab purposes. Just take a look on the figure below to mount it:
 |
 |
TFT and Touchscreen
Basic

Know more
IGEPv2 Expansion integrates LCD backlight driver (TPS61081) and touch screen controller (TSC2046), a 4-wire touch screen controller which supports a low voltage I/O interface from 1.5V to 5.25V.
Serial port
Basic
IGEPv2 Expansion integrates a DB9 RS232 connector. Plug a DB9 cable.
Know more
This peripheral (UART 3) can be used to debug system using kernel traces, getting a remote prompt, etc.
VGA monitor
Basic

|

|
IGEPv2 Expansion integrates a VGA connector, the output VGA signal is equal to HDMI connector. Plug a monitor with VGA input.
Know more
This output is controled by ADV7125KSTZ140 Integrated Circuit.
CAN bus
Basic

Know more
This output is controled by MICROCHIP MCP2515. J703 is a 3.5 mm pitch terminal blocks 4 Positions:
| Signal Name | Pin # |
Description |
| VDD_CAN | J703:1 | Supply Voltage (+5V DC) |
| CANL | J703:2 | CAN Low-Level Voltage I/O |
| GND | J703:3 | Ground |
| CANH | J703:4 | CAN High-Level Voltage I/O |
GSM/GPRS modem
Basic

|
 |
| GSM-GPRS antenna (highly recommended) | SIM card reader |
IGEPv2 Expansion integrates a GSM/GPRS modem to make phone calls or to send SMS or to write and read data from it, etc.
Know more Modem chip Telit GE865 is a small GSM/GPRS Ball-Grid-Array BGA module with next main features:
- Quad-band EGSM 850 / 900 / 1800 / 1900 MHz
- Power consumption (typical values)
- Power off: ‹ 62 uA
- Idle (registered, power saving): 1.6 mA @ DRX=9
Composite Video Decoder
Basic

Know more
Analog input is decoded by TVP5151.
----
You have successfully completed this chapter of the guide.
|

|
If you have any question, don't ask to ask at the IGEP Community Forum or the IGEP Community Chat | 
|
|
|