


Difference between revisions of "Getting Started with IGEP0020 board"
From IGEP - ISEE Wiki
| Line 14: | Line 14: | ||
|} | |} | ||
| − | |||
| − | |||
| − | |||
=== Overview === | === Overview === | ||
---- | ---- | ||
| − | + | {| cellspacing="0" cellpadding="5" border="1" align="center" style="text-align: left;" | |
| + | |- | ||
| + | | bgcolor="#cccccc" colspan="3" | '''Getting started with IGEP0020''' | ||
| + | |- | ||
| + | | [[Image:Igep0020.jpg|250px|center|link=Category:IGEP0020]] | ||
| + | |- | ||
| + | |1) '''Connect a DVI Monitor''' | ||
| + | |- | ||
| + | |2) '''Connect a Serial cable''' | ||
| + | |- | ||
| + | |3) '''Connect Audio In/Out minijack''' | ||
| + | |- | ||
| + | |4) '''Connect USB devices (keyboard and mouse)''' | ||
| + | |- | ||
| + | |5) '''Connect network cable''' | ||
| + | |- | ||
| + | |6) '''Power up IGEP0020 (5V DC)''' | ||
| + | |} | ||
| − | |||
| − | + | This page is a starting point for all products of the IGEP0020 family such IGEPv2 Board. | |
| − | |||
| − | |||
| − | |||
| − | |||
=== Getting started === | === Getting started === | ||
---- | ---- | ||
| − | This | + | This first chapter describes '''how to boot IGEP020''' and also gives some '''basic instructions''' about how to connect some peripherals. |
| − | |||
| − | |||
| − | |||
| − | |||
| − | |||
| − | |||
| − | |||
| − | |||
| − | |||
| − | |||
| − | |||
| − | |||
| − | |||
| − | |||
| − | |||
| − | |||
| − | |||
| − | |||
| − | |||
| − | |||
| − | |||
| − | |||
| − | |||
| − | |||
| − | |||
| − | |||
| − | |||
| − | |||
| − | |||
=== Setting up === | === Setting up === | ||
---- | ---- | ||
| − | First of all, you can begin to '''add peripherals'''. | + | First of all, you can begin to '''add some peripherals'''. |
| − | In this tutorial we are going to | + | In this tutorial we are going to use: |
* the serial cable | * the serial cable | ||
| Line 80: | Line 60: | ||
| − | '''Monitor''' | + | {| cellspacing="0" cellpadding="5" border="1" align="center" width="100%" style="text-align: left;" |
| − | + | |- | |
| − | IGEP0020 has a '''DVI-D interface''' where you can connect a '''HDMI connector to a monitor'''. | + | | bgcolor="#cccccc" |'''Monitor''' |
| + | |- | ||
| + | |IGEP0020 has a '''DVI-D interface''' where you can connect a '''HDMI connector to a monitor'''. | ||
| + | You will need a cable with '''male DVI-D connector''' for the monitor, and '''male HDMI connector''' from IGEP0020. | ||
| + | |} | ||
The Digital Visual Interface (DVI) is a video standard interface designed to provide very high visual quality on digital display devices such as flat panel LCD computer displays and digital projectors. It is partially compatible with the High-Definition Multimedia Interface (HDMI) standard in digital mode (DVI-D), and VGA in analog mode (DVI-A). | The Digital Visual Interface (DVI) is a video standard interface designed to provide very high visual quality on digital display devices such as flat panel LCD computer displays and digital projectors. It is partially compatible with the High-Definition Multimedia Interface (HDMI) standard in digital mode (DVI-D), and VGA in analog mode (DVI-A). | ||
| − | |||
Note that your monitor should be able to support 1024 x 768 @ 60 Hz, which is the default resolution in the preinstalled software. | Note that your monitor should be able to support 1024 x 768 @ 60 Hz, which is the default resolution in the preinstalled software. | ||
| − | '''Serial''' | + | {| cellspacing="0" cellpadding="5" border="1" align="center" width="100%" style="text-align: left;" |
| + | |- | ||
| + | | bgcolor="#cccccc" |'''Serial''' | ||
| + | |- | ||
| + | |Connect an '''AT/Everex Cable''' to the '''10-pin serial header''' on IGEP0020 and a '''[http://en.wikipedia.org/wiki/Null_modem null modem] DB9 male-male''' serial cable between the board and your host machine. | ||
| + | |} | ||
In the preinstalled software, the serial port is configured as a '''Debug interface'''. That means that if you connect an external device to the serial port you will be able to see the '''Linux Kernel traces''', as the system boots. | In the preinstalled software, the serial port is configured as a '''Debug interface'''. That means that if you connect an external device to the serial port you will be able to see the '''Linux Kernel traces''', as the system boots. | ||
Furthermore, you will be able to access IGEP0020 with a '''serial client console''' in your host device (for example, a PC with Linux, Windows, etc.) | Furthermore, you will be able to access IGEP0020 with a '''serial client console''' in your host device (for example, a PC with Linux, Windows, etc.) | ||
| − | |||
| − | |||
| − | |||
[[Image:DSC 0177.JPG|thumb|550px|right|'''Serial''': AT/Everex Cable connected to the 10-pin serial header on IGEP0020. '''Network''': Ethernet cable]] | [[Image:DSC 0177.JPG|thumb|550px|right|'''Serial''': AT/Everex Cable connected to the 10-pin serial header on IGEP0020. '''Network''': Ethernet cable]] | ||
| − | + | To communicate with IGEP0020 via Serial port you have to '''connect your host machine to the serial debug port''' in your IGEP0020. | |
| − | To communicate with IGEP0020 via Serial port you have to connect your host machine to the serial debug port in your IGEP0020. | ||
Once you have set the cable, then you have to run a serial console, or any program that can interact with the serial port in your host machine, such Minicom, PuTTy (Linux, Windows), Terminal (Windows), etc. | Once you have set the cable, then you have to run a serial console, or any program that can interact with the serial port in your host machine, such Minicom, PuTTy (Linux, Windows), Terminal (Windows), etc. | ||
| Line 112: | Line 96: | ||
| − | '''Audio | + | {| cellspacing="0" cellpadding="5" border="1" align="center" width="100%" style="text-align: left;" |
| + | |- | ||
| + | | bgcolor="#cccccc" |'''Audio''' | ||
| + | |- | ||
| + | |Connect an '''external output audio device''' to the 3.5mm jack Audio Out connector in IGEP0020, such as external stereo powered speakers. | ||
| + | |} | ||
External Audio input devices, such as a powered microphone or the audio output of a PC or MP3 player, can be connected to the via a 3.5mm jack (Audio IN). | External Audio input devices, such as a powered microphone or the audio output of a PC or MP3 player, can be connected to the via a 3.5mm jack (Audio IN). | ||
| − | |||
| + | {| cellspacing="0" cellpadding="5" border="1" align="center" width="100%" style="text-align: left;" | ||
| + | |- | ||
| + | | bgcolor="#cccccc" |'''Keyboard & Mouse''' | ||
| + | |- | ||
| + | | In IGEP0020 you might need a powered hub to connect to most USB. | ||
| + | Connect an '''USB hub to the USB host connector''' in your IGEP0020, and then plug your keyboard and mouse into the USB hub. | ||
| + | |} | ||
| − | ''' | + | '''Only USB 2.0 devices will work''' in IGEP0020, so if you connect any USB mouse 1.0 into the USB host connector without using a USB hub 2.0, it will not work. |
| − | |||
| − | + | {| cellspacing="0" cellpadding="5" border="1" align="center" width="100%" style="text-align: left;" | |
| + | |- | ||
| + | | bgcolor="#cccccc" |'''Network''' | ||
| + | |- | ||
| + | | Plug an '''Ethernet cable''' between IGEP0020 and your host machine (or any other network device with ethernet connectivity). | ||
| + | |} | ||
| − | + | IGEP0020 comes with one 10/100BASE-TX Ethernet ports. | |
| + | In the following chapters we will use ethernet to access IGEP0020 with IP configuration, send files, etc. | ||
| − | |||
| − | + | {| cellspacing="0" cellpadding="5" border="1" align="center" width="100%" style="text-align: left;" | |
| − | + | |- | |
| − | + | | bgcolor="#cccccc" |'''Power up''' | |
| − | + | |- | |
| − | + | | Once you have connected the peripherals '''you can apply power''' to your IGEP0020 (5V DCC). | |
| − | === | + | |} |
| − | -- | ||
| − | |||
| − | Once you have connected the peripherals '''you can apply power''' to your IGEP0020 (5V DCC). | ||
* '''Serial''': If you have connected the '''serial debug port''', you will see the system traces as the board is starting up. Finally you will see the boot prompt asking for login. (read the next chapter of this tutorial) | * '''Serial''': If you have connected the '''serial debug port''', you will see the system traces as the board is starting up. Finally you will see the boot prompt asking for login. (read the next chapter of this tutorial) | ||
| Line 155: | Line 151: | ||
Now, you have '''successfully completed the first chapter''' of this getting started guide! | Now, you have '''successfully completed the first chapter''' of this getting started guide! | ||
| + | |||
| + | |||
| + | ---- | ||
=== The next step is: [[What can I do with IGEP0020]] === | === The next step is: [[What can I do with IGEP0020]] === | ||
| − | |||
| − | * [[:Category:IGEP0020|IGEP0020]] | + | This guide is divided in three different chapters: |
| + | |||
| + | * '''Getting started''': A basic tutorial about how to connect and boot your IGEP0020 | ||
| + | * '''What can I do?''': An extensive article to setup the main peripherals of IGEP0020 | ||
| + | * '''Start developing''': Once you have successfully followed the previous tutorials, you are ready to start developing with IGEP Technology. Here you will find some basic tips tricks about how to start with it. | ||
| + | |||
| + | For further information about this board, there exist other sections where you can find specific and extended contents, in-depth description, valuables web links, etc. | ||
| + | |||
| + | If that is your case, visit the '''[[:Category:IGEP0020|main page of IGEP0020]]''' or check the categories at the IGEP Community Wiki. | ||
[[Category:IGEP0020]] | [[Category:IGEP0020]] | ||
[[Category:Tutorials]] | [[Category:Tutorials]] | ||
Revision as of 12:49, 5 March 2012
IGEP0020
|
Overview
| Getting started with IGEP0020 | ||
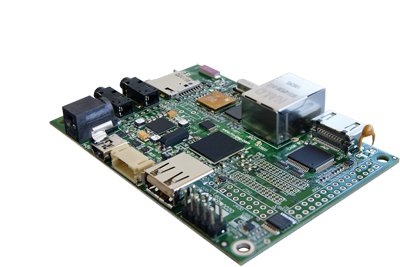 | ||
| 1) Connect a DVI Monitor | ||
| 2) Connect a Serial cable | ||
| 3) Connect Audio In/Out minijack | ||
| 4) Connect USB devices (keyboard and mouse) | ||
| 5) Connect network cable | ||
| 6) Power up IGEP0020 (5V DC) | ||
This page is a starting point for all products of the IGEP0020 family such IGEPv2 Board.
Getting started
This first chapter describes how to boot IGEP020 and also gives some basic instructions about how to connect some peripherals.
Setting up
First of all, you can begin to add some peripherals.
In this tutorial we are going to use:
- the serial cable
- a monitor
- a USB keyboard and a mouse
- a network cable.
Do NOT power up your board yet.
| Monitor |
| IGEP0020 has a DVI-D interface where you can connect a HDMI connector to a monitor.
You will need a cable with male DVI-D connector for the monitor, and male HDMI connector from IGEP0020. |
The Digital Visual Interface (DVI) is a video standard interface designed to provide very high visual quality on digital display devices such as flat panel LCD computer displays and digital projectors. It is partially compatible with the High-Definition Multimedia Interface (HDMI) standard in digital mode (DVI-D), and VGA in analog mode (DVI-A).
Note that your monitor should be able to support 1024 x 768 @ 60 Hz, which is the default resolution in the preinstalled software.
| Serial |
| Connect an AT/Everex Cable to the 10-pin serial header on IGEP0020 and a null modem DB9 male-male serial cable between the board and your host machine. |
In the preinstalled software, the serial port is configured as a Debug interface. That means that if you connect an external device to the serial port you will be able to see the Linux Kernel traces, as the system boots.
Furthermore, you will be able to access IGEP0020 with a serial client console in your host device (for example, a PC with Linux, Windows, etc.)

To communicate with IGEP0020 via Serial port you have to connect your host machine to the serial debug port in your IGEP0020.
Once you have set the cable, then you have to run a serial console, or any program that can interact with the serial port in your host machine, such Minicom, PuTTy (Linux, Windows), Terminal (Windows), etc.
- If you don't know how to set up your serial cable, refer to the following article: How to setup the IDC10 cable. Also, if you do not have Serial port in your host machine you might need a USB to Serial converter to communicate via this port.
- If you are not familiar with a serial console, refer to this page, an extended article about Using serial debug port to communicate.
| Audio |
| Connect an external output audio device to the 3.5mm jack Audio Out connector in IGEP0020, such as external stereo powered speakers. |
External Audio input devices, such as a powered microphone or the audio output of a PC or MP3 player, can be connected to the via a 3.5mm jack (Audio IN).
| Keyboard & Mouse |
| In IGEP0020 you might need a powered hub to connect to most USB.
Connect an USB hub to the USB host connector in your IGEP0020, and then plug your keyboard and mouse into the USB hub. |
Only USB 2.0 devices will work in IGEP0020, so if you connect any USB mouse 1.0 into the USB host connector without using a USB hub 2.0, it will not work.
| Network |
| Plug an Ethernet cable between IGEP0020 and your host machine (or any other network device with ethernet connectivity). |
IGEP0020 comes with one 10/100BASE-TX Ethernet ports.
In the following chapters we will use ethernet to access IGEP0020 with IP configuration, send files, etc.
| Power up |
| Once you have connected the peripherals you can apply power to your IGEP0020 (5V DCC). |
- Serial: If you have connected the serial debug port, you will see the system traces as the board is starting up. Finally you will see the boot prompt asking for login. (read the next chapter of this tutorial)
- LED's: You will also see a few LED's flash in IGEP0020 during the system boot(the sequence will be different based on software version).
- Monitor: Finally, if you connected the DVI-D signal (with HDMI connector) to a monitor, the desktop of the preinstalled software will appear on the screen and you will be able to use the mouse and the keyboard, if connected.
- USB devices: You will be able to use your keyboard and mouse and 'play' with this little distribution.


Now, you have successfully completed the first chapter of this getting started guide!
The next step is: What can I do with IGEP0020
This guide is divided in three different chapters:
- Getting started: A basic tutorial about how to connect and boot your IGEP0020
- What can I do?: An extensive article to setup the main peripherals of IGEP0020
- Start developing: Once you have successfully followed the previous tutorials, you are ready to start developing with IGEP Technology. Here you will find some basic tips tricks about how to start with it.
For further information about this board, there exist other sections where you can find specific and extended contents, in-depth description, valuables web links, etc.
If that is your case, visit the main page of IGEP0020 or check the categories at the IGEP Community Wiki.